readingtype’s workbench

RCH wagon
  • readingtype

    Western Thunderer
    And meanwhile here is one of the most interesting sprues I have seen. It's not only interesting to look at (compact, but lots of channels too -- why?) but it is also well choreographed, as it's the opening act of the kit that it belongs to. Just to make a small inroad and destroy its perfection I'm going to take the four circular items in the middle out and see about fitting them to the assemblies they are part of. To further flog the operatic metaphor: we are shifting scales.

    x804120_sprue_IMG_20210321_144706.jpg
     
    Hunslet DH cab
  • readingtype

    Western Thunderer
    This evening I fitted a larger bit to the iron and poked the solder seams along the inside of the cab roof.

    The solder was very willing to melt and allow me to slide things about a bit. I pushed the edge of the roof that wasn't aligned with the front and rear panels of the cab away from the side and had a few goes at jiggling and gently levering the various walls of the cab around. This has allowed me to bring things into alignment. The front and rear cab walls have been slightly repositioned. As @AJC suggests the bonnets can be used to help square things up. I didn't pull everything apart but even without that radical treatment it is much better now.

    Turns out I'd only tack soldered the bonnets and so these are also truer and better now. I'll let it sit for a bit and think about whether more work is needed. The reflection of the light on the roof and the slight shadow in the first photo shows the curvature isn't quite the same from front to back.


    Hunslet_IMG_20210402_214426_Medium.jpg

    Hunslet_IMG_20210402_214436_Medium.jpg
     
    Fleischmann ex-Prussian T16 wheel improvement
  • readingtype

    Western Thunderer
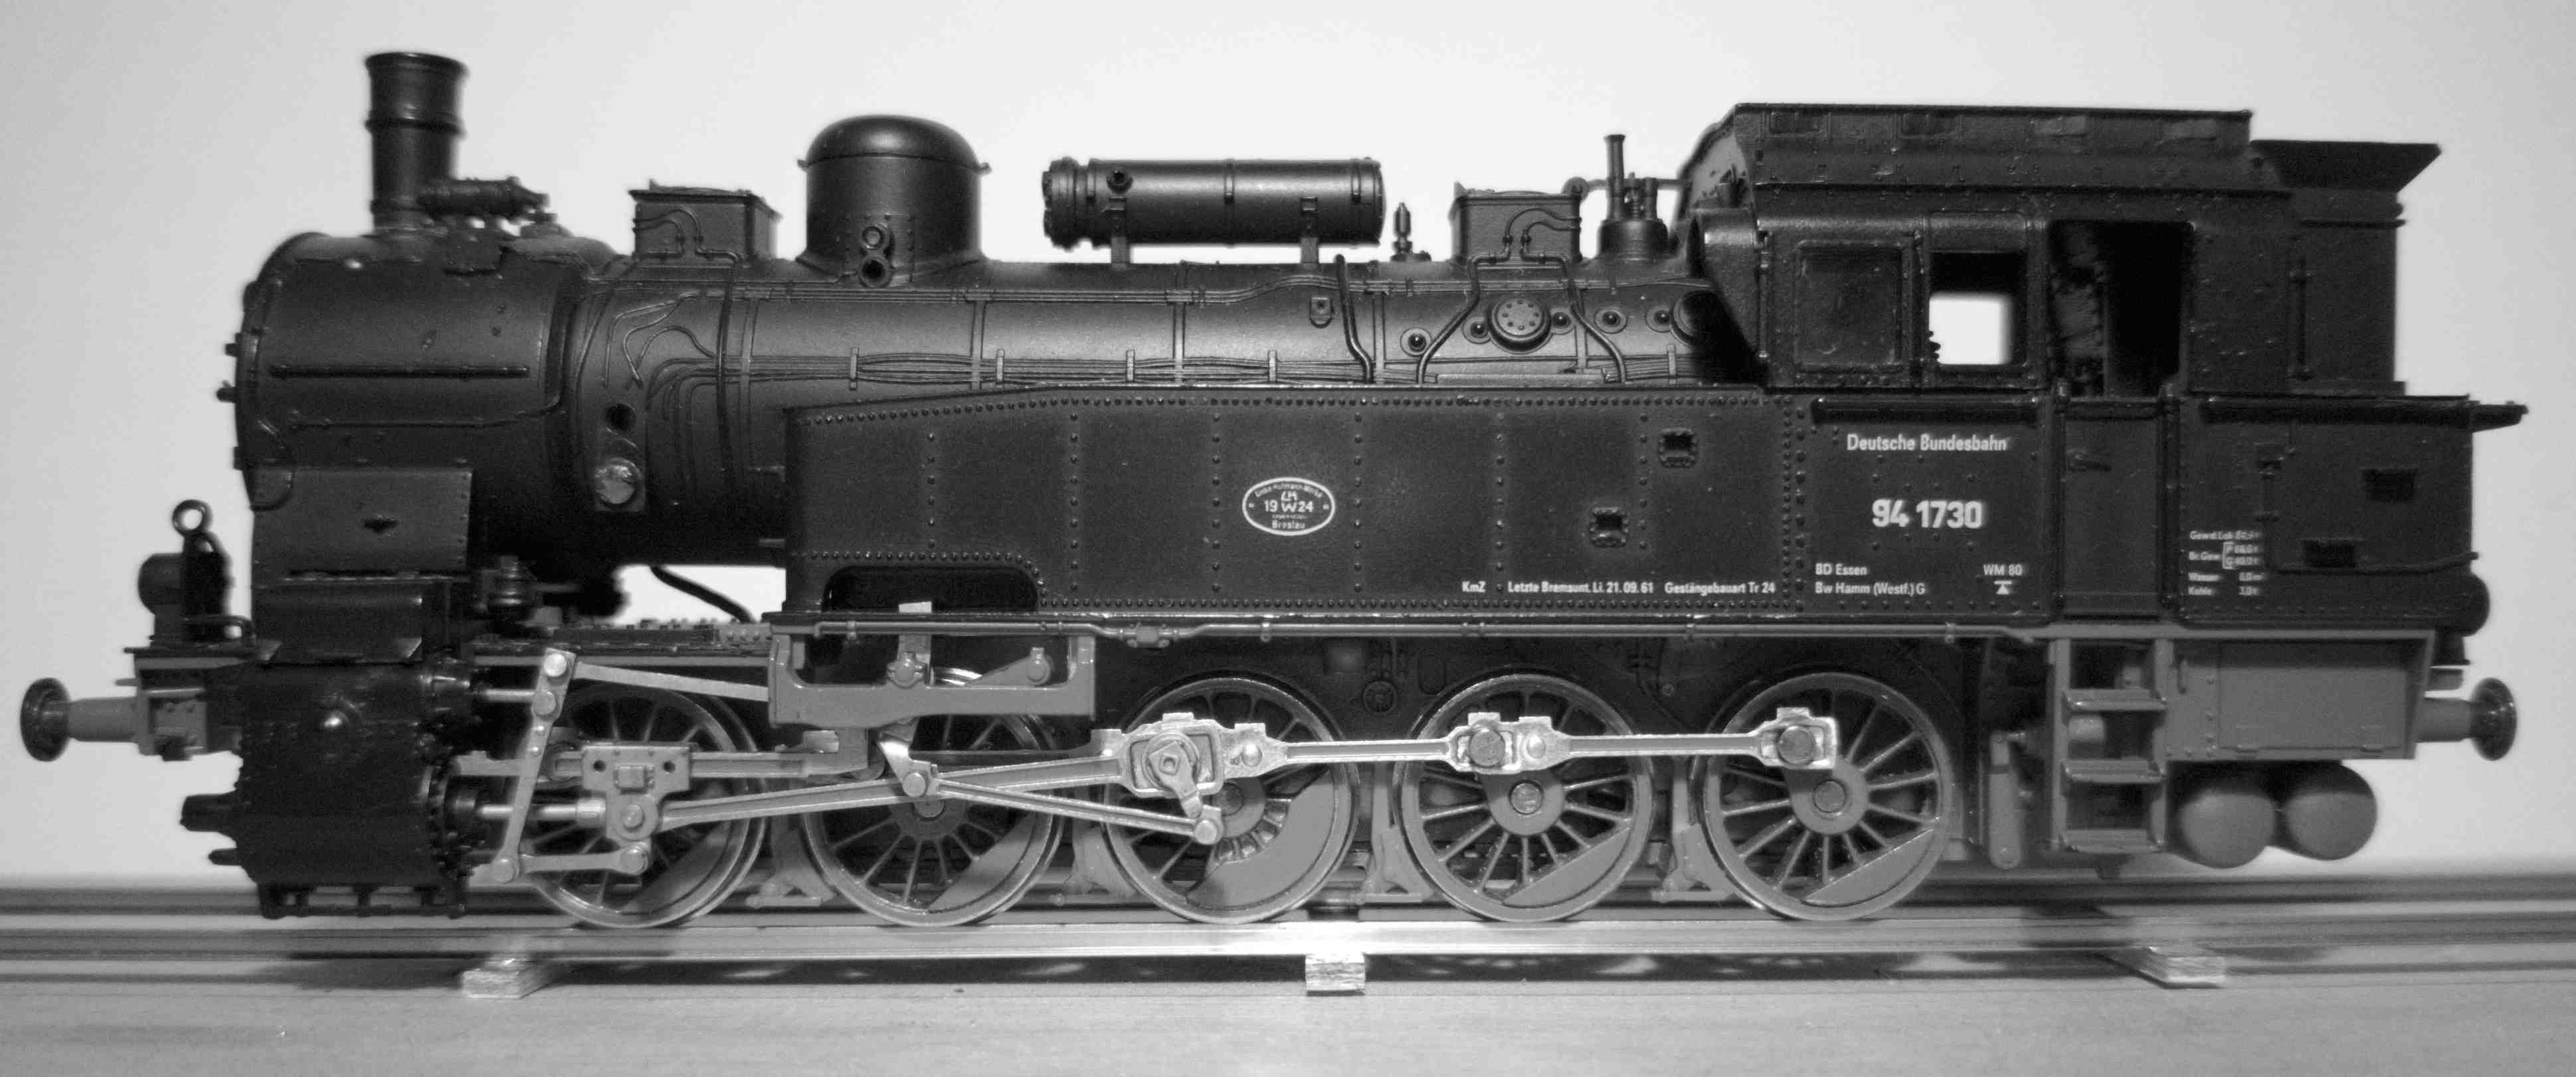
    I have not had an empty workbench since I last posted something here. Here's something completely different in prototype, scale, the nature of the work and the type of model. This time the job is to improve the look of the wheels of a ready-to-run H0 loco. It's the Fleischmann ex-Prussian T16 tank loco from the 1970s or 1980s, bought in a rather battered condition for purposes of experimentation. The standard of fidelity and the workmanship Fleischmann achieved with these models were very good for their day, though of course expectations have risen since then. But having a solid basis suggests the models will be good candidates for some modification. In particular, reducing the huge flange depth.

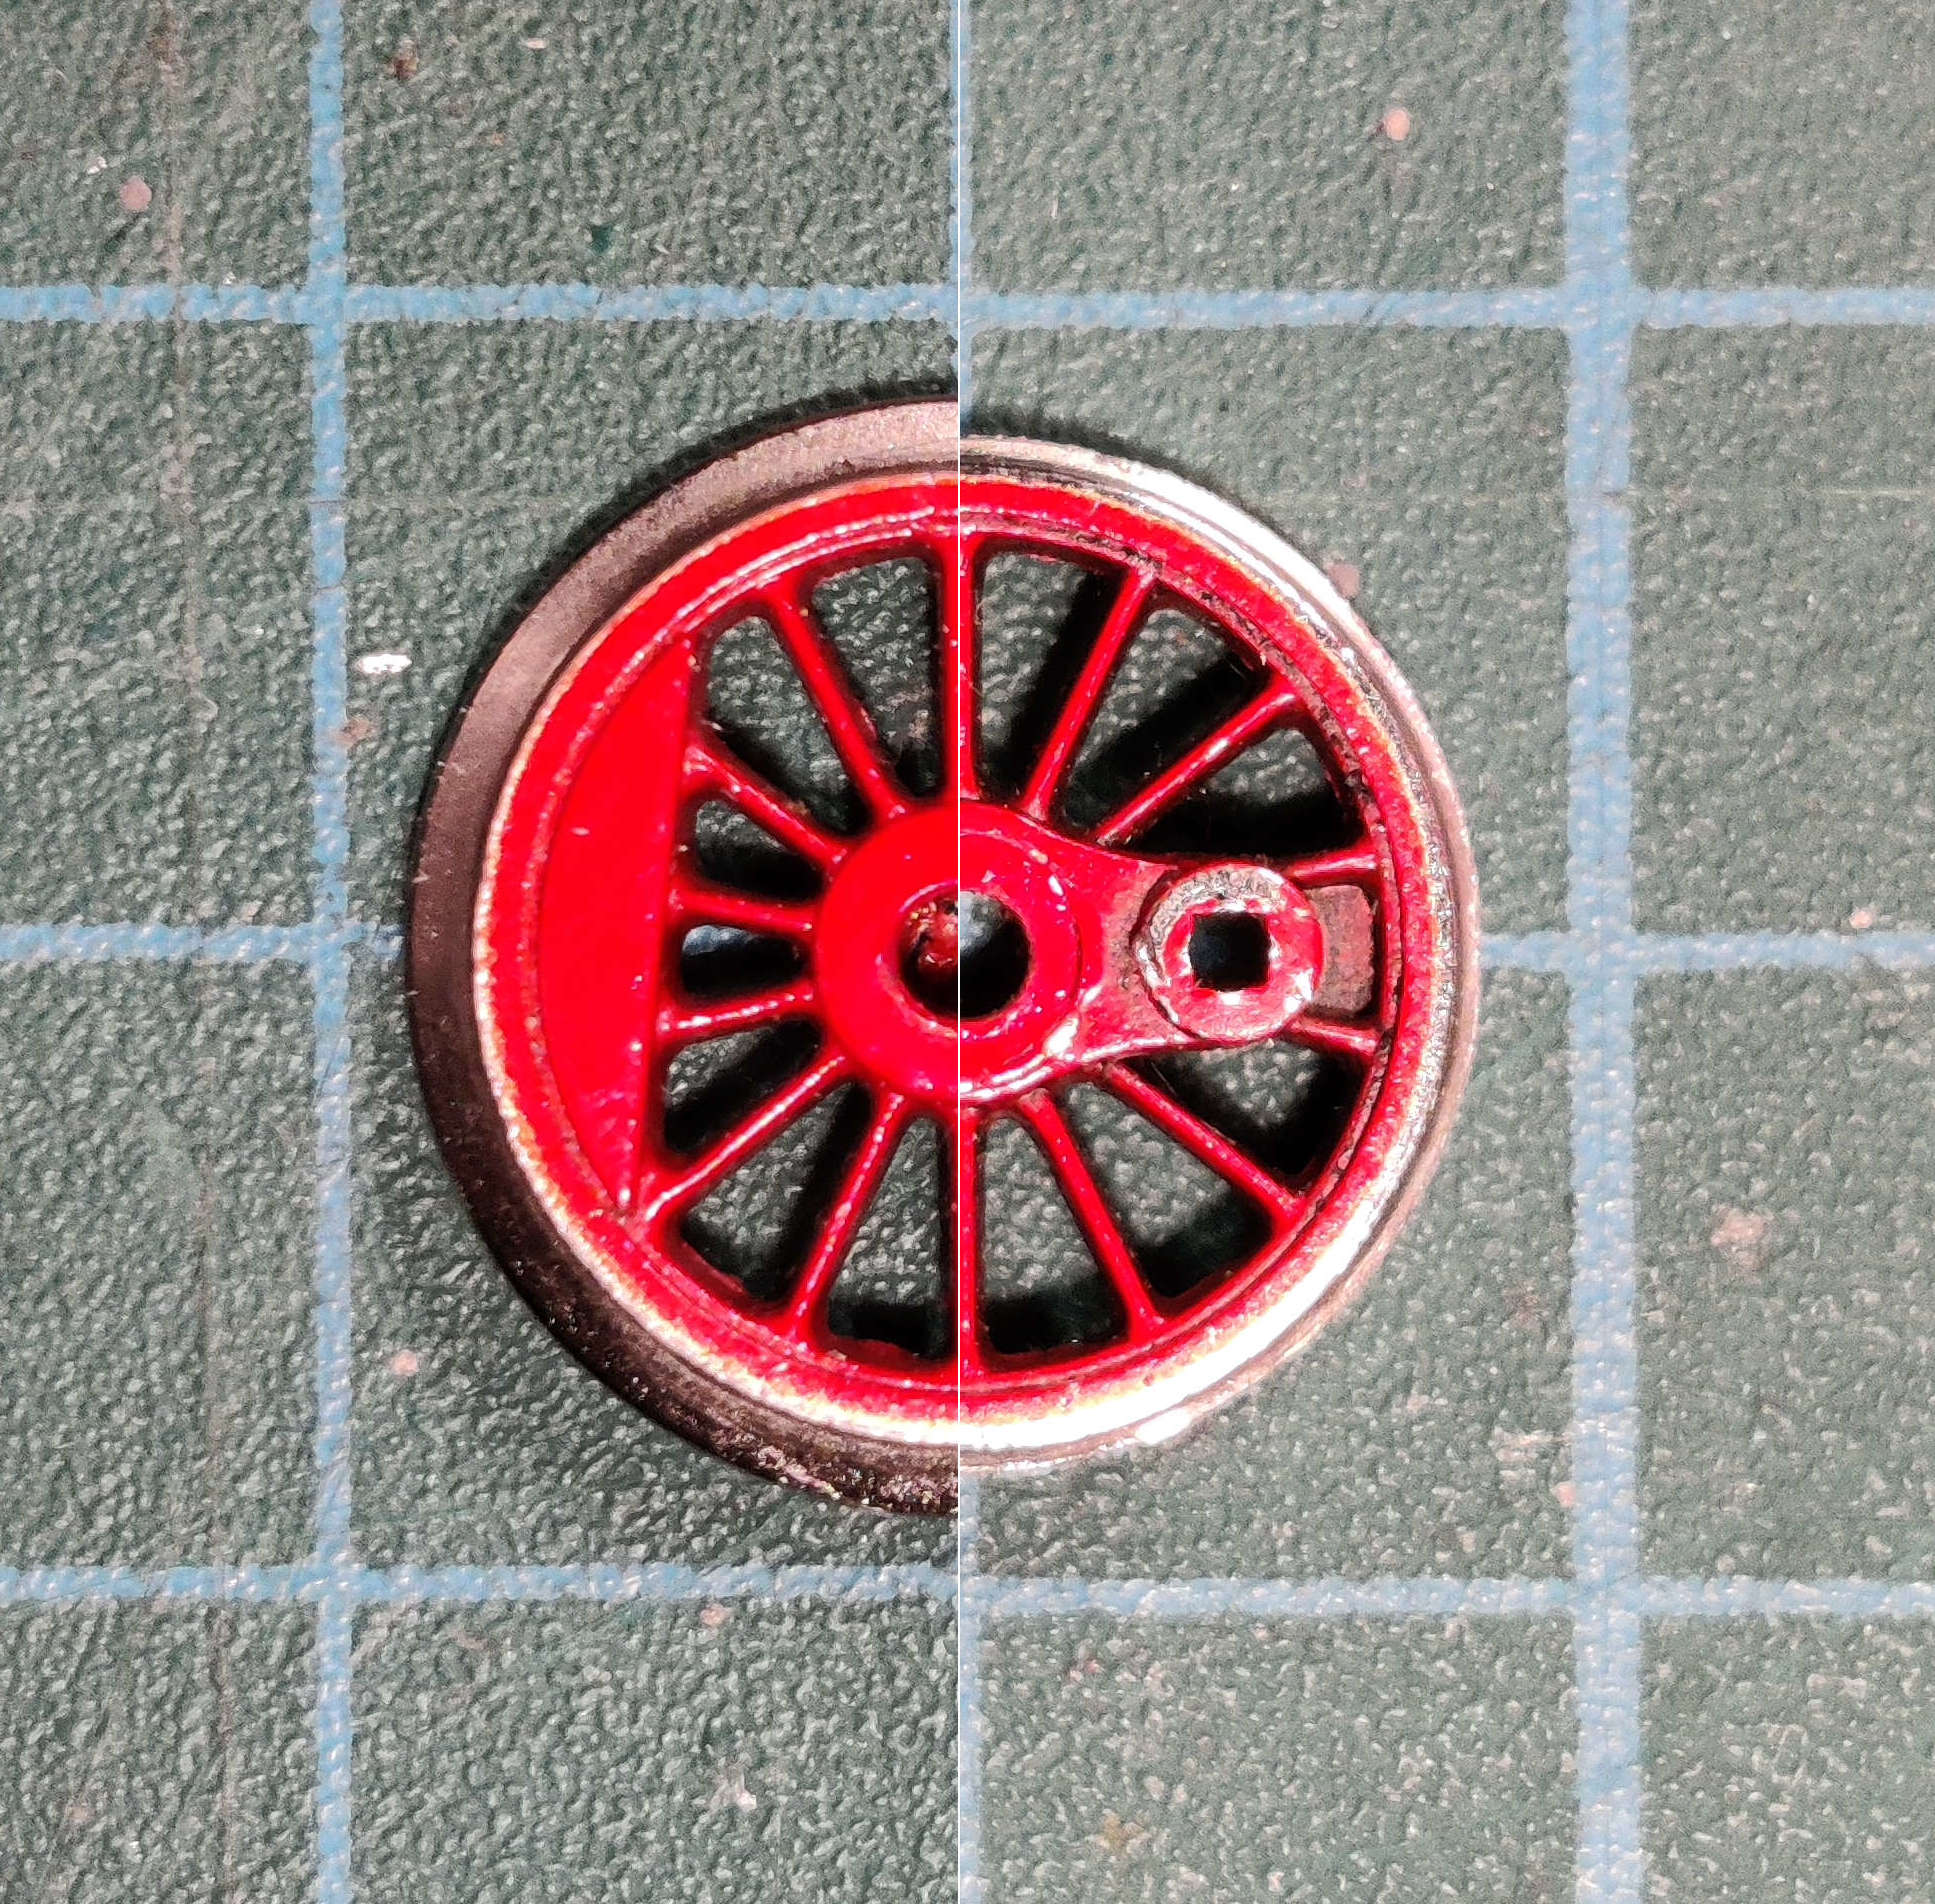
    Here's a composite view to show the difference in flange height before and after. Judged on the shaping of the wheel boss, spokes and tyre rim this is a nice casting and I think that this adds a lot to the positive overall impression given by the model. Newer mass-market models in H0 scale (which probably have a common origin in Asia) tend not to have such nice looking wheels. It really helps that this is a single metal casting.

    Fleischmann_BR94_wheel_before_after.jpg


    Here's the first trial, after I'd worked on the six rearmost wheels. The front two wheels are less easy to see, but the enormous flange still shows up clearly.

    Fleischmann_BR94_IMG_20220124_235959.jpg


    And here's the whole lot done.

    Fleischmann_BR94_IMG_20220126_084557.jpg


    Working on a lathe is still new territory for me and most jobs require trial and error. In this case I had a set of wheels from another loco to test my ideas. What worked best was to put each wheel face-first in a 15mm collet and then cut straight through the wheel back towards the chuck. I set the tool position to take off an amount that brings the flange height fairly close to the relevant NMRA RP-25 dimension (which is based on the full width of the tyre, not as manufactured but after thinning the wheel). The amount I removed from the flange height is about 0.7 mm, the original height being about 1.2 mm.

    I haven't thinned the flange yet because I wanted to reassemble the whole lot and see whether it could cope with real trackwork first. I'd already added some washers to the axles, which had masses of sideplay (the most on the middle axle as expected). More adjustment is still needed now and I might fiddle with the front to back depth of the flanges on the centre drivers -- which would be replicating what was (usually?) done on prototype locos with lots of axles in a rigid frame.

    The prototype locos had very closely spaced axles, Here is a prototype view of a similar loco, apparently missing as many parts as my model. Fleischmann's flanges meant that the wheelbase has to be overscale by about 4 mm, but RP-25 flanges on correctly scaled wheels would still not allow the correct wheelbase. The Fleischmann wheel diameter is 0.5mm underscale so there is a little leeway here. What I would like to do in the end is make new frames for the model and re-use these wheels. This would mean I could get rid of the 'pancake' motor and bring the wheelbase in closer to scale. As noted in my earlier posts this is another area where I have not yet got much experience, so taking time first to tweak the sideplay and find out how to minimise the chances of the loco ending up on the ballast seems to offer a sensible chance of progression. In the past two different aftermarket chassis for the model were available with full compensation and these are still sought after.

    Leaving aside the details that were missing when I bought the loco, as well as the ones that I either pulled off deliberately or may have broken, it is not very difficult to pick out features such as the sketchy valve gear that are pretty crude. But if the model can 'take' the new wheels then that's an encouragement to re-detail because it lifts the overall impression so much. The later releases of this model have much more faithful valve gear, available as a spare part if necessary, and there is a cast metal front buffer beam available from a third party manufacturer to replace Fleischmann's one which has the buffers set the wrong distance apart. In my view this is one of those models that seems to look right somehow, a trick that doesn't seem always to correspond exactly with fidelity to the prototype, so I hope to give mine some more pushes in the right general direction.

    Ben
     
    deadrail
  • readingtype

    Western Thunderer
    Diversion into dead rail and gauge 1 (1:32 scale).

    Due to very clear instructions, and as far as I can judge also due to good product design, I was able to turn a Märklin Prussian T3 - or rather its frames and running gear - into a basic radio controlled vehicle very quickly. I have had fun running it up and down on the carpet without any interceding track. The radio control kit and the battery all come from Micron Radio Control.
    1000007818.jpg
    However gratifying it was to prove the concept, all the real work lies ahead. The loco needs a new boiler, because although the batteries come very close to fitting inside it, the original boiler barrel is a mazak casting that tapers almost 4mm along its length. So the batteries only have a hope of fitting at the open end. And the loco desperately needs a re-paint. Though I am not tied to a red-chassis-red-wheels paint job, the Märklin Museum livery cannot stay.

    I think this model overall is very sound. Its detailing is basic but I can imagine getting pleasure from re-doing the springing and compensation a little bit more convincingly. And then there is the missing air pump; I just missed the chance to buy a casting from a supplier before they shut up shop. Modelling that should be an interesting project.

    Yes this is another unrelated project; but that's how I enjoy spending my modelling time, and I have found the insights and techniques learned often feed into one another.
     
    Prussian T3 New
  • readingtype

    Western Thunderer
    I moved the brass rod from the front to the side of the hook, reducing the extra projection to the minimum. It looks yet uglier (though would still disappear when blackened). It performs better but it's still marginal, and that's not really satisfactory.

    1000016154.jpg

    There are two reasons intrinsic to the coupling and the loco that mean it doesn't work every time. I fixed one: the striking surface had to be filed smooth to prevent the hoop sticking as it slides up.

    The other is partly a weakness in the way this particular coupling is fixed (basically into slightly bendy plastic forming the buffer beam). The coupling can pivot slightly in its mounting hole. The hook loop will hit the striker below the fulcrum. This tends to make the coupling pivot downwards. Having pivoted downwards, the slope of the striker is steeper and that makes the hook loop much less likely to slide up it. Just a small change in the angle has a significant effect.

    There's a third reason that can't be controlled at all, and that's the fact that H0 NEM coupling pockets quite often droop under the weight of the coupler. So different vehicles may present the hoop loop at different heights, and the lower the hook loop the less likely it is to slide up and over the hook. So much for the standard -- and the more expensive rolling stock tends to have thinner, more flexible plastic underframes and is therefore more likely to suffer from this fault. The wagon depicted is hovering on the edge of acceptability in this respect.

    1000016153.jpg

    Back to the T3. I'm going to think about new frames.

    [Edited to resolve weak brain swapping and combining hook and loop here and there]
     
    Last edited:
    Top