You are using an out of date browser. It may not display this or other websites correctly.
You should upgrade or use an alternative browser.
You should upgrade or use an alternative browser.
The Heybridge Railway, 1889 to 1913
- Thread starter Richard Gawler
- Start date
Richard Gawler
Western Thunderer
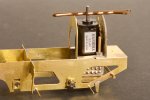
Maybe a High Level gearbox/motor combination would fit?
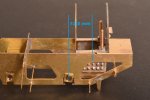
The Branchlines gearbox (cut down) will give me an offset of 10 mm between motor spindle and rear axle, and I think everything will fit if I lean the motor backwards. A High Level "Roadrunner" will give me 12.6 mm and looks like being a better bet.
Last edited:
spikey faz
Western Thunderer
Hi Richard
I successfully used a High Level gearbox/motor in my 7mm/1ft Wantage Tramway No.5. Fits and works a treat!
Mike
I successfully used a High Level gearbox/motor in my 7mm/1ft Wantage Tramway No.5. Fits and works a treat!

Mike
Last edited:
Dave Sutton
Active Member
Same here in both a 4mm and a 7mm version (Shannon rather than WTC No5) 4mm was motor in the boiler with gearbox in the firebox and 7mm was motor in the firebox.Hi Richard
I successfully used a High Level gearbox/motor in my Wantage Tramway No.5. Fits and works a treat!
Mike
* model built by Rob (uses Slater's own motor/gearbox) *
Rob R
Western Thunderer
Richard Gawler
Western Thunderer
The instructions for the kit include some first-class exploded diagrams but no illustrations of a completed model . . . all of the photos of completed models are really helpful, thanks everyone who has posted here and sent me PMs.
I built a motor/gearbox from High Level Kits some years ago but it never went into a loco and I sold it to someone on WT. The mechanism was silky smooth and really quiet and I think my class F deserves one, so order placed and assembly instructions downloaded.
They say simple things amuse simple minds. I have put the four wheels onto the chassis and trundled it along the track. It runs very nicely, with no side rods or drive mechanism

Herb Garden
Western Thunderer
Just think of what it's like for those of us who work in 4mm!View attachment 195411
7 mm scale fireboxes don't come much smaller than this (14 x 20 mm motor).
Richard Gawler
Western Thunderer
I have been there and smaller, but my best achievement was to remove the motor from a Hornby Terrier so it could do banking and push-pull working with another loco moving the trainJust think of what it's like for those of us who work in 4mm!

I have changed wheels to EM and P4, even cut an Electrotren chassis across the middle to make an 0-4-0 from an 0-6-0 (and it still worked), but I never got bitten the way I have been by 7 mm. Though I can’t help thinking, a working class F in 4 mm scale would impress me more than a Pacific in any scale.
adrian
Flying Squad
pah! I see your 4mm firebox and raise it with Clarry Edward's LNER J70 tram engine. That had a firebox 3/4" square - the difference being it was a live steam loco and it was a genuine firebox - none of this electrickery malarkey.Just think of what it's like for those of us who work in 4mm!
Richard Gawler
Western Thunderer
Well, I was able to meet Rob and some other WT’ers at the Shenfield show yesterday; and to inspect his class F. This has raised plenty of food for thought . . .

Thanks to Dave, Giles, Rob and Tim for giving me so many ideas.
- Although I used 10BA screws as crankpins on my Y14, the much smaller class F really does need 12BA fittings and I will have to stay with these (as supplied with Slater’s wheels) however fiddly I find them.
- There is hardly any free space between the front crankpins and the backs of the connecting rods and I will try to use countersunk screws to fix the connecting rods onto the crossheads. If I run out of space I could resort to brass shims behind the cylinders so this is a good reason to fix the cylinders with studs and nuts until I know they are there for good.
- I have never seen a class F, but the kit can reproduce the daylight visible looking downwards through the running plate towards the track. It would be a shame to block this off with a r/c receiver in front of the rear axle.
- The “front suspension bracket”(?) with which I am so pleased will also block some of this daylight but it is between the two front springs so will be less intrusive than it might be. Still, the simple rocking axle used by Rob makes for a less intrusive look.
- There are plenty of sandbox and toolbox options for these locos. I am thinking of having two central sand boxes (like Rob’s model) because this makes for a greater coal capacity in the bunkers and a slightly simpler model.
- Supposing I make a new boiler from a U shape of brass, there might just be space to put a r/c receiver/speed controller vertically along the centre line of the model, with a AAA size 3.7V battery each side of it – all inside the width of the scale-size saddle tank.
- It is usual (apparently) for modellers using 4 mm scale to fix such a half-boiler to the frames and I could do the same. The underside of the saddle tank would hide the join.
- After I get the High Level gearbox I could try fitting it onto a pair of Lomac wagon wheels to get an idea of the gearing and the speed to expect from different supply voltages to the Mashima 1420. This sounds easier than putting the motor/gearbox into the loco chassis only to have to take it out again to allow more construction.

Thanks to Dave, Giles, Rob and Tim for giving me so many ideas.
Last edited:
Richard Gawler
Western Thunderer
4. Crossheads and Connecting Rods
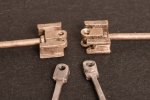
The slots in the crossheads as supplied (left) are too shallow and too narrow to fit over the connecting rods. The slot width I want is wider than a junior hacksaw blade but narrower than a slitting disc. I ended up adding a nickel silver washer onto the back of the rod (right) and then filing this to shape to take up the worst of the play left by the slitting disc.
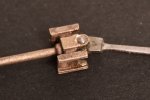
I tapped the crosshead through 12 BA and soldered in a stud cut from a steel machine screw. The stud is soldered and then cut flush on the back so it ought to clear the crankpin behind.
The mechanism moves freely without excess side play, so I guess okay but I have unsightly gaps in the top and bottom of the crosshead. Maybe there is a better way?

The slots in the crossheads as supplied (left) are too shallow and too narrow to fit over the connecting rods. The slot width I want is wider than a junior hacksaw blade but narrower than a slitting disc. I ended up adding a nickel silver washer onto the back of the rod (right) and then filing this to shape to take up the worst of the play left by the slitting disc.

I tapped the crosshead through 12 BA and soldered in a stud cut from a steel machine screw. The stud is soldered and then cut flush on the back so it ought to clear the crankpin behind.
The mechanism moves freely without excess side play, so I guess okay but I have unsightly gaps in the top and bottom of the crosshead. Maybe there is a better way?
Last edited:
Richard Gawler
Western Thunderer
Richard Gawler
Western Thunderer
5. Gearbox and Motor
The assembly of the gearbox from High Level Kits has been a bit fraught (more intricate than I expected), though the result is working perfectly.
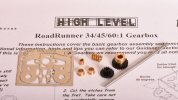
The rod for the layshaft is 2 mm diameter steel and the two axle bushes are for the 1/8 inch Slater's axle. The instructions call up 1 mm wire to brace the frame but I didn’t find any of this in the package so I used some 0.9 mm wire from my spares box.
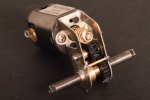
I used the lathe to face off the ends of the lay shaft, to shorten the spacer to fit, and to face off the new screw for the final drive gear. I could have done these with files but the lathe makes a better-looking job. I also used the lathe to open out the boss of the final drive gear to let it slip over the 1/8 inch Slater’s axle and I would find this operation difficult do accurately with hand tools. I used several tapered broaches to open up holes in the frames and in the bearings; the broaches are much more controllable than a rat-tail file.
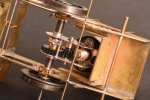
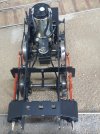
Having got through this, the first trial installation into the model was straightforward. I filed two notches into the frame of the gearbox to clear the brake rod and help the motor to stand upright. The worm gear is barely 1 mm thick - this might prove inadequate for 0 gauge but I can forget about it until it fails.
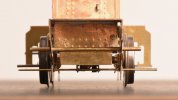
The mechanism will be visible from the behind the loco but not from the sides.
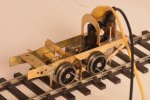
The best news is, the chassis makes a respectable speed on a 4.5 volt supply and manages most of 1 foot per second (scale 30 mph) on 7 volts. So the choice of the 45:1 reduction ratio for the gearbox was the right choice.
The assembly of the gearbox from High Level Kits has been a bit fraught (more intricate than I expected), though the result is working perfectly.

The rod for the layshaft is 2 mm diameter steel and the two axle bushes are for the 1/8 inch Slater's axle. The instructions call up 1 mm wire to brace the frame but I didn’t find any of this in the package so I used some 0.9 mm wire from my spares box.
- However hard I tried, I could not persuade the worm gear, its spacer and its shim washer to all fit inside the frame. Eventually I took the vernier to this combination and found it about 4 thou too long to fit into the space available. So I took about 7 thou off one end of the spacer and then everything slipped into place.
- The grub screw supplied for the final drive gear is a metric size somewhere below 10BA and barely 2 mm long with a slot in one end. This took me beyond my threshold of patience after I dropped it on the carpet for the third time (it's still there) so I tapped the boss of the gear 10BA and put in a steel screw with a cheese head.
- The worm did not seem to mesh sufficiently closely with its worm gear. I took a file to the boss on the end of the motor, and opened up the mounting holes in the frame; and thus created enough movement to make a binding worm/worm gear combination. I think it is best to make a tight mesh and then ease this off, otherwise you never know if the mesh is quite right.

I used the lathe to face off the ends of the lay shaft, to shorten the spacer to fit, and to face off the new screw for the final drive gear. I could have done these with files but the lathe makes a better-looking job. I also used the lathe to open out the boss of the final drive gear to let it slip over the 1/8 inch Slater’s axle and I would find this operation difficult do accurately with hand tools. I used several tapered broaches to open up holes in the frames and in the bearings; the broaches are much more controllable than a rat-tail file.

Having got through this, the first trial installation into the model was straightforward. I filed two notches into the frame of the gearbox to clear the brake rod and help the motor to stand upright. The worm gear is barely 1 mm thick - this might prove inadequate for 0 gauge but I can forget about it until it fails.

The mechanism will be visible from the behind the loco but not from the sides.

The best news is, the chassis makes a respectable speed on a 4.5 volt supply and manages most of 1 foot per second (scale 30 mph) on 7 volts. So the choice of the 45:1 reduction ratio for the gearbox was the right choice.
Last edited:
Richard Gawler
Western Thunderer
For the record, the 1420 motor and 'Roadrunner' gearbox could rotate forwards around the rear axle so the motor ends up inside the saddle tank.
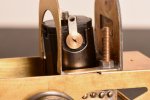
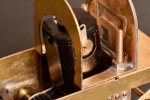
Doing this lifts the worm so it is disappears out of sight inside the ash pan; but needs alterations to the back of the smokebox and probably the boiler as well. I want to keep the motor inside the firebox.


Doing this lifts the worm so it is disappears out of sight inside the ash pan; but needs alterations to the back of the smokebox and probably the boiler as well. I want to keep the motor inside the firebox.
Richard Gawler
Western Thunderer
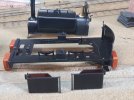
I have added a new frame spacer in front to the firebox. This makes a front for the firebox and improves the view between the frames, stiffens up this end of the chassis, and has let me add a vertical support for the motor.
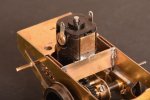
It should be possible to tie the motor to this support or use a wedge to hold the motor upright against it. Solder tidied up after removing the motor and gearbox.
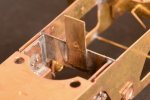
The motor support completes the structural work on this end of the chassis.
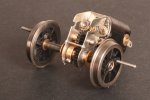
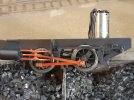
I ground down the motor spindle to let it clear the brake rod passing underneath. This could have gone better because the worm started to slide unseen towards the motor and so the shaft ended up 2 mm shorter than I expected. I have now secured the worm with 188-degree solder, this worked into the joint with Frys’ Powerflow flux and the micro flame torch. I can hardly recommend this approach but the motor does still run.
With the motor support in place I now have to separate the motor from the gearbox when I remove them from the model, but the motor fixing screws have good access from underneath.
This completes my modifications to let the model use the Mashima 1420 and the High Level 'Roadrunner' which it was never designed to accept.

It should be possible to tie the motor to this support or use a wedge to hold the motor upright against it. Solder tidied up after removing the motor and gearbox.

The motor support completes the structural work on this end of the chassis.

I ground down the motor spindle to let it clear the brake rod passing underneath. This could have gone better because the worm started to slide unseen towards the motor and so the shaft ended up 2 mm shorter than I expected. I have now secured the worm with 188-degree solder, this worked into the joint with Frys’ Powerflow flux and the micro flame torch. I can hardly recommend this approach but the motor does still run.
With the motor support in place I now have to separate the motor from the gearbox when I remove them from the model, but the motor fixing screws have good access from underneath.
This completes my modifications to let the model use the Mashima 1420 and the High Level 'Roadrunner' which it was never designed to accept.
Last edited:
Richard Gawler
Western Thunderer
6. Rear Crankpins
The Slater's wheels for the Class F have 1/8 inch axles (instead of the usual 3/16 inch) and come with smaller bushes for the crankpins. These bushes go onto the usual 12BA screw.
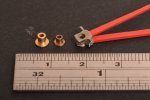
Two of the small bushes, with a standard Slater's crankpin bush for comparison.
I have exchanged correspondence with the manufacturer of the kit, and understand they intend the rear crankpin assembly to use two bushes; though this is not mentioned in the kit instructions. I think this would look a bit clumsy, so I have taken a different approach . . .
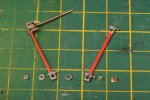
From right to left:
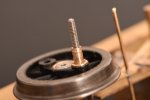
I swapped the cheesehead screws supplied as crankpins for some screws with countersunk heads. I find these easier to fit flush into the backs of the wheels. The completed crankpin therefore has the bush topped off with the turned-down nut.
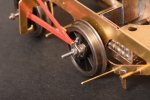
Completed assembly.
I used a steel 12BA screw as a mandrel to hold the various nuts for turning in the lathe.
The Slater's wheels for the Class F have 1/8 inch axles (instead of the usual 3/16 inch) and come with smaller bushes for the crankpins. These bushes go onto the usual 12BA screw.

Two of the small bushes, with a standard Slater's crankpin bush for comparison.
I have exchanged correspondence with the manufacturer of the kit, and understand they intend the rear crankpin assembly to use two bushes; though this is not mentioned in the kit instructions. I think this would look a bit clumsy, so I have taken a different approach . . .

From right to left:
- crankpin bush, slightly shortened to reduce free play and with the base skimmed to make for a better appearance
- brass 12BA nut, turned down in the lathe to match the diameter of the bush
- (side rod)
- 10BA washer, with its hole opened out to clear the bush
- (connecting rod)
- 12BA washer supplied with the wheels
- 12BA nut, skimmed down by about 15 thou to give a better appearance

I swapped the cheesehead screws supplied as crankpins for some screws with countersunk heads. I find these easier to fit flush into the backs of the wheels. The completed crankpin therefore has the bush topped off with the turned-down nut.

Completed assembly.
I used a steel 12BA screw as a mandrel to hold the various nuts for turning in the lathe.
Last edited:
Richard Gawler
Western Thunderer
7. Front Crankpins
The front crankpins are, as I feared, more difficult than the rear ones.
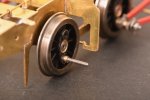
I have dispensed with the Slater's bush and fitted a turned-down 12BA nut in its place to reduce the width of the assembly.
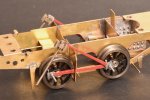
I can add the side rods on both sides and have a beautifully free-running mechanism . . .
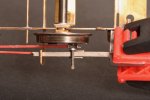
But there is no space behind the crossheads. A 12BA nut is 1.2 mm thick and this one is skimmed down to 0.7mm.
Where to find half a millimetre or so? I can imagine a shim between the cylinder and the frame, plus adjustments to the motion plate where it holds the slide bars. Or, skim a bit off the front of the wheel. Or solder the nut onto the crankpin and file this down until there is a clearance. Or even rivet the end of the pin over a washer to hold the connecting rod! I need to remember, this crankpin is delivering much of the traction and is not an ornament,
I see, the model made by @Rob R (his post) has a small rectangle of thin metal in the place of the nut. Perhaps this piece of metal was drilled and tapped 12BA and then soldered onto the pin?
Suggestions welcome. I am determined to not build an inside-cylindered "class F"
The front crankpins are, as I feared, more difficult than the rear ones.

I have dispensed with the Slater's bush and fitted a turned-down 12BA nut in its place to reduce the width of the assembly.

I can add the side rods on both sides and have a beautifully free-running mechanism . . .

But there is no space behind the crossheads. A 12BA nut is 1.2 mm thick and this one is skimmed down to 0.7mm.
Where to find half a millimetre or so? I can imagine a shim between the cylinder and the frame, plus adjustments to the motion plate where it holds the slide bars. Or, skim a bit off the front of the wheel. Or solder the nut onto the crankpin and file this down until there is a clearance. Or even rivet the end of the pin over a washer to hold the connecting rod! I need to remember, this crankpin is delivering much of the traction and is not an ornament,
I see, the model made by @Rob R (his post) has a small rectangle of thin metal in the place of the nut. Perhaps this piece of metal was drilled and tapped 12BA and then soldered onto the pin?
Suggestions welcome. I am determined to not build an inside-cylindered "class F"

Osgood
Western Thunderer
Looking very nice indeed.
So if you have a threaded bush, this could also do the job of the nut if it had a retaining flange.
Like this but with a threaded bore:
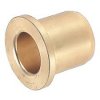
You will gain the difference between flange thickness and nut thickness.
You’d just need a couple of flats on the flange (or a couple of holes on outer face for a 2-pin ‘spanner’ for assembly/removal) and some loctite type stuff to ensure it doesn’t work loose?
So if you have a threaded bush, this could also do the job of the nut if it had a retaining flange.
Like this but with a threaded bore:

You will gain the difference between flange thickness and nut thickness.
You’d just need a couple of flats on the flange (or a couple of holes on outer face for a 2-pin ‘spanner’ for assembly/removal) and some loctite type stuff to ensure it doesn’t work loose?
Last edited:

