The Mad Squasher Strikes Again.......

Fitzroy

Western Thunderer
I just did a tool tryout on a male press die for pressing O gauge tinplate coach bodies (1937 Victorian Railways Spirit of Progress stock). Just a temporary setup, Male die only with a piece of brass sheet as a female die/intensifier. My technique is to spark erode a male die, get it heat treated, then if I have or can find a press with sufficient tonnage, press into some ground mild steel plate to create a female coining die.

This time around, the people who made the male die and who normally pony up a 500 ton press to do the necessary have had a breakdown, and because I am just about their only customer for using the 500 ton press these days, haven't fixed it. So there it sat while a lot of more urgent things happened, for about 3 years now.

Finally I have felt like I can get my head above water and did some sums to see if there was any way I could make the female die (short of finding another 500 ton press). It seemed on paper that I might be able to do it with my 60 ton press so I decided to have a go at (a) trying to press a blank by using the male die and a sheet of brass on the female side to see if it looked ok and (b) play with pressing into some mild steel and see if it can be formed into the female die. Sums said in theory it would work, so inspired I rushed out to the garage and had a go.

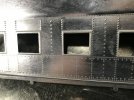
Below are the section of coach side blank- no alignment tools so it is slightly out of whack. Still, I'm happy. Checking with some scrap steel I found the press has enough tons to form the mild steel too, so I am well pleased. Now I can start building a proper die setup! And behold! Steel coaches! Finally I can get on with it!
 

Attachments

  • IMG_3995.jpg
    IMG_3995.jpg
    286.4 KB · Views: 49
  • IMG_3997.jpg
    IMG_3997.jpg
    459.4 KB · Views: 48
  • IMG_3998.jpg
    IMG_3998.jpg
    397.3 KB · Views: 46
  • IMG_4001.jpg
    IMG_4001.jpg
    340.3 KB · Views: 48

Jordan or Plymouth Mad

Mid-Western Thunderer
Here on Western Thunder we have long had the Back of the Class, for bodgers like me, the Front of the Class, for machine tool engineers, brass loco builders, S7* bods, etc..... :) :thumbs:
We're going to need a whole new annex to fit in a 500 ton press.... :confused: :drool: ;)

*Edit:- other True Scale disciplines are available. :)
 
Last edited:

Fitzroy

Western Thunderer
Thanks Matt!
Some more progress yesterday and today- I got some mild steel blanks to use as female dies, so spent yesterday filing down the first one to get rid of the mill scale and provide a nice flat surface to press. Of course ideally I should have a surface grinder to do this, but they are expensive. I do have a friend who has one but I don't like prevailing on him too often, and he is 25 miles down the road. Anyway, I have a nice big brand new bastard file bought for flattening an engine manifold joint, so it was but the work of a couple of hours to get it down to fresh flat new metal. An upper body day. Anyway, today was the interesting bit- press it against the male die in the 60 ton press. Because the male die is slightly flexible being only 12mm thick, if I put a very thick heavy block on the bottom, with the female blank above that and the male die on top,and the ram bearing down on that, I can keep pressing away moving the ram position relative to the die set until I have pressed it locally everywhere getting enough of the tons where I need them. Since the male die is heat treated it doesn't take on any permanent set.

The next job was to drill and fit dowel pins to align the two dies. I already had 5mm holes sparked into the male die, so I clamped them together and drilled through in the drill press. The dowel pins align the dies and also align the tinplate blank in the die set.

Proof of the pudding- the finished blank pressed in the die set:- looking nice and crisp, and happily well aligned.

IMG_4022.jpg


Here's a close-up:-


IMG_4024.jpg

I'm very pleased with that!

The next job is to do the same with the dieset for the other end of the coach, organise the roof forming die and make a new prototype. Here is a pic of the existing prototype with blank sides. I formed the roof by hand and it was a nightmare. I definitely want a tool for that. I am very happy with the bogie dies. It should look good once all together.

IMG_4026.jpg
 

Fitzroy

Western Thunderer
Monday was time to summon more reserves of latent brawniness and file down the second female die blank. This time I speeded things up by starting with a flap wheel to get scale/paint or whatever it is off, and then switch to the file. Here's a shot after slightly less time than before- not quite finished, you can see it is slightly dished in the middle quarter, from the rolling process-

IMG_4036.jpg


Another little while and that finally came up so it was "flat enough" all the way across. Then I pressed the blank with the right hand end male die to get the female impression- if anyone wants to see pics of the dies, I'll put them up. It will probably explain a lot.

Then drill through for dowel pins, and most importantly, I had to then attack each end of both sets of dies with a die grinder, so that overlapping pressings wouldn't get obliterated by the second die impression.

Then it was time to try pressing a fresh blank to see if they would line up-

IMG_4038.jpg

If you look very carefully at the central overlap area, (about where my thumb is) you see there is a very slight witness mark, but I am satisfied (Eric Morecombe wouldn't be!)- the rivet lines etc line up, and I can very slightly adjust the female dies where there is a mark in the ridge mouldings from it repressing on the overlap.
The ridge mouldings substantially disappear in the next operations- the bottom is used as a folding guide and the top one gets flattened when the roof shape is lightly stretch-formed.

IMG_4040.jpg

IMG_4365.JPG
Here's a real 1937 car for comparison. The top moulding shape almost isn't there but there is one. It varies from coach to coach. Sadly they need a repaint. They are Cor-Ten steel, but they are slowly deteriorating.
And here's a 1937 bogie from it, repurposed on one of the old wooden cars.


IMG_4368.JPG
 

Brian McKenzie

Western Thunderer
Hi Pieter,
I'm bursting with curiosity, there's a lot you haven't told us :).

Did you prepare a copper or graphite electrode, to have the male die EDM'd? What is the overall size of this plate, and the type of steel and hardening process used?

Are the window openings chopped out simultaneously - or is this done before or after pressing rivets and window impressions?
Your photos suggest that coach sides might be pressed in two incremental passes of length.

If ultimately, you can press/form a female die plate, is there a danger of any detail being sheared off through lack of clearance (window borders, more so than rivet heads)?

I use a 10 ton flypress to form two or three windows at a time using milled and hardened dies, so can appreciate and respect the work you are undertaking :bowdown:.

Brian McK.
 

Fitzroy

Western Thunderer
Hi Brian, thanks for the interest! I should say I am blown away by your Barclay build, and all the clever stuff you have done producing fittings, it's been inspirational.

Now, some answers...
I use a variety of materials, typically copper or graphite, and sometimes tungsten and mild steel, depending on what I am doing. These ones were done with two graphite electrodes, a rougher and finisher, both identical. Graphite because easy to machine and removing very little material, if I was taking more off it is a messy machining job. Any material that conducts well and has a high melting point is good, if you have time/money to run the machine and don't mind making multiple electrodes. I have thought of using lost wax cast brass electrodes to make a small tool because you can just keep replacing the castings as they melt away. Gile's laser cutter would be perfect to make copper dies for pressed "cast iron" railway signs and nameplates.

Overall size of each die plate was 110 x 250 mm and that is the largest size I have ever undertaken. The material varies. I've used D6, D2 and O for male tools depending on availability of a given section (knife steel sections are handy). I always get it through hardened and tempered to file hard approximately 55-60 Rockwell C and don't get it hardened as much as could be, so its less likely to chip or break if not held or supported properly. I'd rather it be tough than super hard. I'm not pressing more than hundreds of something, so I'm not likely to have a problem with wear.

All the tinplate chopping is done beforehand in one hit by laser cutting to create a blank. I make sure the blank dimensions are ok for tabbing and slotting, folding etc in a tryout before finalising embossing die layouts. Before that I check with paper/card engineering.

The pressing is just the two shots for each complete side.

With shearing, there is a danger depending on the depth of press and how ductile the material is. Generally I have a slight draft angle on cutters when making the electrodes to stop complete shearing and help prevent parts being stuck on the die. 30 degrees is plenty usually, for very shallow steps like a panel overlap of 0.005" it can be less.

A ten ton flypress should be pretty handy, depending on the level of detail you are trying to put in. The more accurate the dies, the less tonnage you need. You could probably do an entire 4 wheel van side with that, if it was coming down evenly. Hope that helps.

Cheers

Pieter
 

40057

Western Thunderer
Hi Brian, thanks for the interest! I should say I am blown away by your Barclay build, and all the clever stuff you have done producing fittings, it's been inspirational.

Now, some answers...
I use a variety of materials, typically copper or graphite, and sometimes tungsten and mild steel, depending on what I am doing. These ones were done with two graphite electrodes, a rougher and finisher, both identical. Graphite because easy to machine and removing very little material, if I was taking more off it is a messy machining job. Any material that conducts well and has a high melting point is good, if you have time/money to run the machine and don't mind making multiple electrodes. I have thought of using lost wax cast brass electrodes to make a small tool because you can just keep replacing the castings as they melt away. Gile's laser cutter would be perfect to make copper dies for pressed "cast iron" railway signs and nameplates.

Overall size of each die plate was 110 x 250 mm and that is the largest size I have ever undertaken. The material varies. I've used D6, D2 and O for male tools depending on availability of a given section (knife steel sections are handy). I always get it through hardened and tempered to file hard approximately 55-60 Rockwell C and don't get it hardened as much as could be, so its less likely to chip or break if not held or supported properly. I'd rather it be tough than super hard. I'm not pressing more than hundreds of something, so I'm not likely to have a problem with wear.

All the tinplate chopping is done beforehand in one hit by laser cutting to create a blank. I make sure the blank dimensions are ok for tabbing and slotting, folding etc in a tryout before finalising embossing die layouts. Before that I check with paper/card engineering.

The pressing is just the two shots for each complete side.

With shearing, there is a danger depending on the depth of press and how ductile the material is. Generally I have a slight draft angle on cutters when making the electrodes to stop complete shearing and help prevent parts being stuck on the die. 30 degrees is plenty usually, for very shallow steps like a panel overlap of 0.005" it can be less.

A ten ton flypress should be pretty handy, depending on the level of detail you are trying to put in. The more accurate the dies, the less tonnage you need. You could probably do an entire 4 wheel van side with that, if it was coming down evenly. Hope that helps.

Cheers

Pieter
Hi Pieter

Very impressive! Literally.

One obvious question occurs to me. Would you be able to use your press technique to emboss an already lithographed tinplate sheet? Obviously, all the bending and embossing was done after the lithography back in the day. But their tooling might have been rather different to yours.

If you were minded to try, some ‘alternative’ Bassett-Lowke style coaches would be welcome additions to a vintage railway. Full brakes (BGs) and 1st/3rd composites (CKs) to match the 1930s lithographed all-1st and brake/3rds would be operationally very useful …

Martin
 

Rob Pulham

Western Thunderer
This is just amazing quality work!

A side-effect of viewing this thread - I suppose I'm going to have to bring this old retired 200T water press (that I was trying hard to forget about) home and get it operational again.
Thank you (I think....) :rolleyes:

View attachment 265043

View attachment 265044

View attachment 265045
Is there anything machinery wise that you haven't got tucked away somewhere Tony...

Oh to have the room. Although I would have loved it, I had to turn down a Pantograph mill recently because I have nowhere store/use it.
 

Brian McKenzie

Western Thunderer
Hi Pieter,

Many thanks for expanding on your intriguing work processes :). I would never have got around to spark eroding a largish flat plate to leave projections for pressing rivet heads.
(Small clusters of rivet heads have been formed with pins of hardened silver steel inserted into steel bar.)

You're doing it tough using files etc to clean up hot rolled steel plate. If it wasn't for the 'ditch' between us, you'd be welcome to use a surface grinder here (for Northern Hemisphere readers, the Tasman Sea between Australia and NZ is colloquially known as the 'ditch', similarly as for the 'pond' between UK and Trumpland).

Not every attempt at pressing things here has gone well. Carefully shaped mild steel blocks, for forming the twisted shape of cowcatchers, became dented in their soft state, before I got many useful parts.
IMG_0703a Cowcatcher press tool.jpg

Way back, when working in a smaller scale, these W irons were punched out for foldup wagon underframes.
IMG_0714a Punched W irons.jpg

Window frames have been pressed, but most rivet heads get punched by CNC programmed from a CAD listing.
IMG_0715a Cab side.jpg

The EDM doesn't get used much. The advent of 3D printing has sadly killed off injection moulding ideas. I've held off machining graphite for electrodes, not wanting the mess and potential for machine harm.

ATB,
Brian McK.
 

Fitzroy

Western Thunderer
I remember an article in New Scientist in the 1970s about the London Hydraulic Power Company, who sold high pressure water for lifts, etc. I think Tower Bridge was originally powered this way.
 

Giles

Western Thunderer

I remember an article in New Scientist in the 1970s about the London Hydraulic Power Company, who sold high pressure water for lifts, etc. I think Tower Bridge was originally powered this way.
It was - together with the stage machinery of all the west end theatres!
 

Osgood

Western Thunderer
I remember an article in New Scientist in the 1970s about the London Hydraulic Power Company, who sold high pressure water for lifts, etc. I think Tower Bridge was originally powered this way.
Off topic, but from an interesting Radio 4 review on modern communications (uncertainties due to my memory in brackets):

The (American?) electric lift makers had a real job trying to sell their products in central London during the 30s as the hydraulic lifts with their smooth and reliable operation were well loved by operators and users.
By the (mid 60s?) demand for hydraulic power had all but dried up and eventually the LHPCo ceased trading.

Move to the modern age (nineties/naughties?) and sparring telecoms companies were having great difficulty obtaining, and were being charged a fortune for, permits to dig up central London streets to install fibre-optic cables.
One shrewd operator discovered the LHP Co dormant on the shelf and bought it for a pound (or hundred), but why?

Because LHP had a right to dig up with no penalty the streets to access and maintain their (cast iron?) HP water mains, which just happened to be laid all over the same area of central London where fibre optics had to be installed!
As you can imagine, that company ‘cleaned up’.
 
Last edited:

Phil O

Western Thunderer
We had a 120 ton dual acting hydraulic press in the boilershop, which used weights acting on a piston to give the squeeze, I never saw the weights removed, so as far as I know it always had the 120 ton maximum available. It was very controllable in the right hands, you could bring it down on an egg, as I once saw.
 

Fitzroy

Western Thunderer
Hi Pieter

Very impressive! Literally.

One obvious question occurs to me. Would you be able to use your press technique to emboss an already lithographed tinplate sheet? Obviously, all the bending and embossing was done after the lithography back in the day. But their tooling might have been rather different to yours.

If you were minded to try, some ‘alternative’ Bassett-Lowke style coaches would be welcome additions to a vintage railway. Full brakes (BGs) and 1st/3rd composites (CKs) to match the 1930s lithographed all-1st and brake/3rds would be operationally very useful …

Martin
Hi Martin- short answer is yes you can. You need to make some effort to protect the litho by polishing the dies and maybe greasing them heavily with tallow - these days you'd use thin self adhesive plastic film. But sadly getting metal decoration done is getting harder and harder. When Alan Middleton did his repro Hornby no 2 coaches, there were probably at least half a dozen litho tin print shops in Melbourne, but the last one left moved to Sydney several years ago. I think Ace and Darstaed using suppliers in China, and the onward march of demographics, have pretty well satiated the market for tinplate coaches these days.
 
Top