The Heybridge Railway, 1889 to 1913

Ian@StEnochs

Western Thunderer
The agricultural engine would not have the big generator/dynamo mounted ahead of the chimney, nor indeed the rather fancy barleytwist poles, but I guess they’d come off with the roof.

I’m a little puzzled by the thing at the back over the coal space?
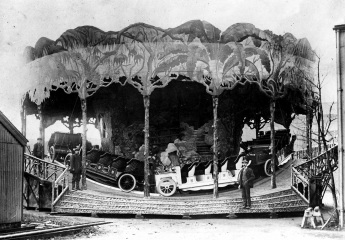
there are some prototype photos in Brian’s “Tim Mills’ Photos” thread.
Some Showmans engines were fitted with a basic pole crane for erecting rides. Could be part of that.
 

RichardG

Western Thunderer
The B6 is a fairly massive engine (especially in Showman's form) with 7ft driving wheels. When the 1:50 scale model is viewed as 1:43 scale, these wheels become 6ft, and I think the Corgi model is best viewed as the basis for a slightly smaller road locomotive. This could be loaded on the 14-ton machinery wagon and bound for export.

When I remove the canopy I will reveal an empty space where a scale model would have its connecting rods and valve gear. I could have a tarpaulin to conveniently cover this!

The Corgi model represents Fowler 9393 named 'Sir John Fowler'. This was built as a road locomotive, then later rebuilt as a showman's locomotive - though there are many detail differences with the Corgi model:

Fowler 9393, Sir John Fowler - Sewards of Petersfield

I am happy to chop the model about. I bought it because it was cheap, and I think it will be easier to alter this than to build a white metal kit from scratch. I will be happy to end up with "a Fowler road locomotive" rather than trying to replicate an actual prototype.
 

RichardG

Western Thunderer
Fowler works number 9475 looks like a suitable basis for my model. This was built in 1902 and exported to Australia. Some details and modern photos:

Fowler 9475 (BS 8015) at Grace's Guide

One of the photos at Grace's Guide shows that a man stood about as tall as the hind wheels. I think it will be fair to imagine Fowler built similar-size engines as road locomotives (smooth tyres), and Heybridge Basin was a convenient port of departure for my model. I can cut it to pieces without ending up with a nonsense. The chimney can be removed and stowed beside the engine to remove doubts about the loading gauge.
 

paulc

Western Thunderer
The discs I am using are sanding discs not cut-off discs. They are discs of aluminium oxide paper with a self-adhesive backing, stuck onto to a pliable mount made from some kind of synthetic rubber.

View attachment 260627
On the left is the one I have been using. It is nearly worn out and I cannot find the spare discs. On the right is a smaller disc with its mount.

View attachment 260626
The smaller version is from this "Rotary Tool Accessory Set" by Parkside. I seem to remember this set cost less than £10, so about 3p per item!

I am holding the mini-drill in my dominant hand and the brass part in my other hand. You see the cusp disappear before your eyes. The drill speed is I guess around 12,000 rpm.

I don't think there is any great risk of "digging in", but you can remove too much material if you linger too long. I have done this (just once!) and it shows up in one of my photos if you look carefully.
Use or make or buy a suitable sized hole punch and make your own discs . Buy some 5" or 6" sticky back discs of the grit that you want then just punch out your discs. An automotive supply shop should be able to help with the discs , they may even have a mixed pack of grit types .
 

RichardG

Western Thunderer
Use or make or buy a suitable sized hole punch and make your own discs . Buy some 5" or 6" sticky back discs of the grit that you want then just punch out your discs. An automotive supply shop should be able to help with the discs , they may even have a mixed pack of grit types .

Thanks for this Paul. I have enough Parkside discs from Lidl to keep me going for a couple of years. After this I can try cutting my own!
 

RichardG

Western Thunderer
I see he SPADed…
I've got a feeling, an amber light shows for three seconds at UK traffic lights? Re-watching the video, I think he started the stopping process immediately the lights went amber - and it took him three and a half seconds to come to a halt. It's always worthwhile to understand how other people's road vehicles behave, I know this from the way agricultural tractors do steering.
 

RichardG

Western Thunderer
I now have a 105 gram wagon carrying 75 grams of lead; and the length over headstocks is 180 mm. Just what the guidelines for weighting say.

The springs are a tiny bit askew but their arms have straightened up on the model.

Going back to the machinery wagon . . .

DSC_2244.jpeg
I have now added the rest of the white metal castings. I mentioned the crooked springs earlier, but really these are among the best castings I have ever received with a kit.

DSC_2251.jpeg
The castings together weigh about 20 grams, and with them all fixed into place I found the springs were always fully compressed. I have had to remove about 35 grams of lead to make the sprung axle "live" again. So I now have a 165 gram wagon instead of a 180 gram one, to make the springs work properly. I don't understand why I have had to do this. The ballast weights are now one thickness of lead plus a sheet of card to stop them rattling.

DSC_2249.jpeg
The floor of this wagon is a bit of a curiosity. So far I have three designs:
  1. Transverse planks seen on wagons in BR days and on the Airfix/Dapol 4mm model; and on dia.50 wagons photographed in 1904;
  2. Longitudinal planks seen in the drawing published in GE Journal no.90;
  3. A mixture of transverse and longitudinal planks and steel plates represented on the model.
I am accepting what I have been given, though I think the model looks better without some of the half-etched fold lines. I have filled these with brass wire.

This completes the build before painting, after which I can add the buffer heads/stems and the roping rings.

This has been a good kit for me. It has been difficult enough to hold my attention, while the parts have gone together with very little adjustment, and certainly no major butchery or replacement.
 
Last edited:

magmouse

Western Thunderer
So I now have a 165 gram wagon instead of a 180 gram one, to make the springs work properly. I don't understand why I have had to do this.

Possibly what is confusing you is that you have one fixed axle. When the weight depresses the sprung end, the wagon turns about the other (fixed) axle. The turning force is a ‘moment’ - force times distance. weight in the centre of the wagon provides a smaller moment than the same weight at the end of the wagon, because it is closer to the point of rotation (the fixed axle).

You can also think in terms of leverage - the weight near the end of the wagon has more leverage than when it is near the centre. Same physics, described differently.

Nick.
 

RichardG

Western Thunderer
Possibly what is confusing you is that you have one fixed axle.

Yes Nick it is, or rather was. The 10 grams of castings at the unsprung end have negligible effect on the suspension. The 10 grams at the sprung end have much the same effect as 20 grams at the centre of the wagon; and indeed 35 grams spread along the underneath of the floor. All I could think of was the CofG not moving. Glad I've got that one cleared up in my head!
 

RichardG

Western Thunderer
Please excuse me one more photo!

DSC_2259.jpeg
The GER machinery wagon is actually quite important to me because it gives me something to carry a motor car. The wagon is more believable for this than the NER Lomac which is too modern and too far out of area. Even though it was my first etched kit!

The GER wagon is also a milestone for me because I now have a vehicle for every type of traffic I have identified for the railway (I have quietly dropped the salt traffic). I have built and bought 23 kit- and scratch-built wagons and NPCS to do this, supplemented by some Dapol coal wagons.

So future wagons can be refining the capabilities the railway has now. For example a twin bolster wagon to carry timber, as well as the existing open wagon with a match truck.
 

40057

Western Thunderer
A while ago, I established there are no kits in 7mm scale for a ploughing engine, and probably only one kit for an agricultural engine. This being an Aveling Porter from Duncan Models. On the bright side, Corgi do a 1:50 scale showman's engine and one of these has just arrived.

Hello Richard

The Bassett-Lowke name had several owners after the original model railway business ceased, and during one of the ownerships a series of kits in 1:43 scale were produced for various traction engines, agricultural machines etc.

These kits were produced in the 1990s and are not regarded as ‘Bassett-Lowke’ by enthusiasts for the original company. They seem to turn up second hand and unmade quite frequently, so might be worth you looking out for.

See:


Martin
 

RichardG

Western Thunderer
. . . a series of kits in 1:43 scale were produced for various traction engines, agricultural machines etc

Thank you Martin. The Burrell traction engine and the Ransomes threshing machine look particularly suitable for my layout. I can see they turn up on eBay from time to time . . . I will keep an eye out for them.
 

chigley

Western Thunderer
Thank you Martin. The Burrell traction engine and the Ransomes threshing machine look particularly suitable for my layout. I can see they turn up on eBay from time to time . . . I will keep an eye out for them.
the thresher is to tall approx 90mm from rail tops, maybe with wheels removed perhaps
 

RichardG

Western Thunderer
the thresher is to tall approx 90mm from rail tops, maybe with wheels removed perhaps

I have a photo of a threshing machine loaded onto one of these wagons in LNER days, and the machine scales to be about 9 feet tall on its wheels.

90 mm equates to most of 13 feet which seems enormous - I'd better give this particular kit a miss.
 
Top