7mm The Derby Line - Rolling Stock Gladiator Crab

dibateg

Western Thunderer
Thanks Dave - or I was too lazy to attach 40+ ventilater hoods!

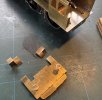
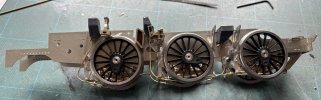
Thanks Peter, the Crab is a background project, and I've been busy with other stuff over the past month or two, with the railway taking priority. But the gloomy weather has facilitated progress over the past couple of days, with me tackling the hated task of adding the sand pipes! I used modified Griffin Sand traps and short lengths of brass tube for the sand pipe unions. The clearances were a bit tight for the wheels with that rhombic casting and the valve guide support, so some grinding was called for..
IMG_5491.JPG
 

P A D

Western Thunderer
Looks like all the paint has fallen off mine!

Yes, I had to do some grinding on the valve slide support. If you are using Slaters pick ups you'll need to grind some metal off the sides of the forward brake cylinder, or maybe thin down the nuts on the plunger to avoid contact when compressed. Mine was already painted when I found out, so it was a bit scary getting in there with a cutting burr sphere in the mini drill.
Cheers,
Peter
 

dibateg

Western Thunderer
I prefer to have my pick ups in the horizontal plane relative to the axle - the exception is the rear driving set, where the motor gets in the way..

I wanted to be able to get a speaker in to the smokebox, so I've hollowed out the front of the fierbox ( that made a mess ) and cut access holes in the boiler formers...
IMG_5495.JPG
 

LarryG

Western Thunderer
From any angle, the LMS 'Crab' was a beautiful loco. That said, the rides I had behind them were almost always sluggish.

The door vents on LMS flush sided Period II and III coaches started to be removed in the blood & custard era. Stanier's coaches, while looking modern, were not known for their rust-inhibiting qualities.
 

Dave Holt

Western Thunderer
Tony,
That's looking very neat and tidy and coming along well.
There does look to be something not quite right with the front truck. The top of the truck frame, just visible above the wheel flange, should be horizontal but looks to slope in the photo. Perhaps the pivot mounting need to be lower or packed to lower it?
Dave.
 

P A D

Western Thunderer
Dave,
Just had a look at mine and the truck is level. I didn't need to pack the pivot point or lower it. Perhaps it's just some distortion in the image but I'm sure Tony will comment.

Tony,
Any thoughts on the width of the boiler bands? They look on the narrow side and will perhaps create problems applying the lining (Fox in my case).

Cheers,
Peter
 

dibateg

Western Thunderer
Thanks Larry - good to have some background on the LMS coaches!

Dave - you are right - thanks, it's only been loosley put together at the moment - but I can do something about it!

Peter - yes, they do seem a bit narrow. My boiler came preformed, so not much I could do about it - apart from making another one!

Cheers
Tony
 

P A D

Western Thunderer
My boiler was in the flat but the width of the bands never occurred to me until after it was sandwiched between smoke and firebox. :headbang:
20251107_124753.jpg
 

P A D

Western Thunderer
Just found my copy of the Wild Swann profile on the class and the width of the bands is 2in. I think it was wider on other classes but I haven't checked. 2in = 50.8mm ÷ 43.5 = 1.17mm. I've checked the bands on the model and they are about 1.1mm give ot take, so they are correct!

The Fox red lining is spaced wider than that so I'm wondering if the lining will fit either side of the band??? Using 4mm scale lining might be an option. A bridge to cross later.

Cheers,
Peter
 

Dave Holt

Western Thunderer
2" wide boiler bands appears to be the standard width on LMS locos. On Stanier locos, they were 16 SWG (1/16") thick.
Dave.
 
Last edited:
John's preference was always to make the boilers half etched with the bands full thickness. Makes rolling easier but my preference is to omit the bands and let the painter use tape if they are lined.
I agree. Add the boiler bands at the painting stage. It makes rolling the metal easier. Also there may be variations over time to allow for.
David
 

dibateg

Western Thunderer
Yes - I prefer the boiler without etched bands, but I won't be painting the loco. I'm sure my painer will do his excellent work on it as usual...!

Tony
 

LarryG

Western Thunderer
Make your own boiler bands. Lay a stip of Scotch tape (like Sellotape) on a piece of glass (borrow it from a framed picture!). Paint it black (gloss aerosol) and rule the two red lines using a draughtsman's pen. Cut with a new knife blade and hey-presto.....boiler bands that fit your boiler bands.

Use the boiler bands within a short time before the black paint goes brittle.
 

dibateg

Western Thunderer
Thanks Larry

In the meantime I've been struggling with this Rapido 16XX. I cannot get it to run smoothly, it's a lovely model, but runs liek a dog. You could drive a bus through the slack in the crankpins. So I've bushed the leading two wheel sets.
IMG_5864.JPG


It always sticks at the same spot. I've checked and adjusted the quartering with my rudimentary jig. A simple 0-6-0 should be easy to get running!
IMG_5897.JPG

I know the drive is ok as it run nicely without the rods. It's better but not perfect. Something I am missing somewhere!
 

PaxtonP4

Western Thunderer
Thanks Larry

In the meantime I've been struggling with this Rapido 16XX. I cannot get it to run smoothly, it's a lovely model, but runs liek a dog. You could drive a bus through the slack in the crankpins. So I've bushed the leading two wheel sets.
View attachment 268929


It always sticks at the same spot. I've checked and adjusted the quartering with my rudimentary jig. A simple 0-6-0 should be easy to get running!
View attachment 268930

I know the drive is ok as it run nicely without the rods. It's better but not perfect. Something I am missing somewhere!
If it runs OK without the rods and your quartering is correct then you need to ensure that the con-rods are identical.
 

Dave Holt

Western Thunderer
Coupling rods......
It looks to me as if the centre crank pin is set slightly higher than the outers and the coupling rods do not form a dead straight line. Might just be the photo, but it might be worth re-checking the quartering.
Dave.
 

dibateg

Western Thunderer
Thanks chaps - yes there is bump in my cutting mat Dave!

On further investigation - yes, the rear rods were too long! I decided to solder the rods together to make them rigid. There was enough slop in the centre crankpin holes to shorten the length by soldering the rods closer together, making a snug fit for the centre crankpin. I took out all the bushes that I had made. It runs a lot better now, without twitching ! I was close to turning up some alignment rods, that would have been the next step.

Thanks for the suggestions.
Tony
 

LarryG

Western Thunderer
Thats the trouble with mass-prodiction. If one's wrong theyre all wrong. Some loco still have a rocking motion which is noticeable on rollers. For me, it maked the model worthless. Had it with a batch of Hornby Ivatt Black Fives and Large Prairies.
 
Top