Stevers' Stall of Shame

Stevers

Western Thunderer
DSC03512.JPG
A revised 1862 First with the extra unprototypical footboard brackets at each end to keep them straight(er). Close inspection of the tumblehome will reveal the pixellated steps that Anti-Aliasing (if genuinely available on the Mono 4K) might soften. Beyond it is an 1859 Pass. Brake sporting what I understand to be a 'Nine Elms' style caboose, painted, glazed and most importantly, safely separated from the edge supports and fitted without accident. This is the version raised by 0.5mm compared with the Weddell drawings to better match photos. Happily the templates I made for the original version now fitted perfectly! The double sided tape that I used to secure template to glazing had a more sticky and less sticky side. The stickier side needs to be on the template not the glazing - don't ask me how I know! The use of a brand new Swann Morton blade being essential when attempting to cut this (or probably any) sort of 'Plastiglaze'.

DSC03516.JPG DSC03515.JPG
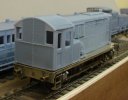
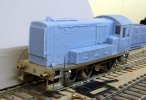
The very controllable Armstrong Whitworth DE shunter will be useful to shunt all these old coaches around, so I've been amusing myself by adapting the Mercian Models running plate to accept my 3D printed body. With the body being scale and therefore smaller than the Mercian etched body with thicker walls, clearances are now quite tight. I reduced the hole in the middle by edge soldering some 2 x 2 mm brass angle to give an upstand to locate and glue the body to. I then found that the added material interfered with motor mount and pickups requiring me to provide clearance via gapping the new upstand. When offering up the body to the running plate and viewing it from the front with a critical eye, I realised that the bonnet front had been printed on the skew with a distinct curve to the prominent radiator. I've also added the rear footsteps and am working on a solution for fitting the air tank across the back that can't be in one piece due to the rear steps with that wide bottom tread trapping the tank and/or the chassis.
 

Stevers

Western Thunderer
DSC03517.JPG
The CAD for a complete body with Knife Edge supports was all ready to print when I realised that the body I already had only needed a 'nose job'. It was easy (in 3D CAD) to cut off the back of the complete body and then to add an Airfix style joining flange. Allowance was made for the additive kerf, but some filing for final fit was necessary. The body was cut just shy of the nose panel line and carefully filed back for a perfect fit along the panel line. Truing up the nose has done wonders for the alignment of the rest of the body, and only that gap under the battery boxes lets it down. I'll probably pad that with styrene then file it flat. The nose was a small part that lent itself to printing without knife edge supports. In replacing the nose I was able to beef up the handrail brackets and the piano wire handrails are in position for the very first time.

DSC03522.JPG
The roof was scaled 1.002 in width and height and 0.998 in length. This made it fractionally larger and shorter than before and compensated for the 'additive kerf' that affects the fit of 3D printed parts. As can be seen it was printed without the benefit of knife edge supports to get things printing 'properly'. As I proceeded to cut the nose off, the resin this side of the bonnet fractured, happily once the cut was trimmed back I was able to invisibly epoxy it all back together again.

DSC03519.JPG
The other flavour of close coupled 3-set for the Downton Train Crash. Nearest is an 1862 First, then an 1862 Second and finally an 1865 Third. The First is unbraked, the Second and Third are braked and have pads on the nearer ends. All have the extra brackets to keep the footboards nice and straight. The First class was printed without Anti-Aliasing (AA), the Second and Third was printed with some measure of AA. The settings used were AA=4 and Gray Level=1. With AA on, the 'Cones of Calibration' tests became the 'Cones of Contradiction'. The cones would suggest over exposure when the sword fitted beautifully in the skull and wouldn't fit in either rock. Similarly the ale was a perfect fit in the mug. With AA exposure was increased from 2s to 2.4s. AA has softened the pixellated lines with no apparent loss of detail. AA was also employed on the new nose and roof for the AW diseasel. As can be seen in the photos above it is striking how low the roofline of these coaches is compared with the AW or my W Class.
 
Last edited:

Stevers

Western Thunderer
DSC03532.JPG DSC03536.JPG
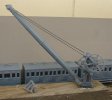
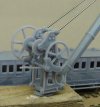
This is first of my yard cranes to be printed on my Anycubic Photon Mono 4K. A 'Verwood' crane in 7mm scale, I can just about squeeze it all (with the spreading Blueprint Studio supports) onto the tiny build plate. The frame has extra detail found on a set of pictures of near identical cranes found on the LBSCR. The print took just under five hours, and the Blueprint Studio supports came away easily before washing. The jib halves and pillar were printed vertically, and the gears and rollers horizontally, but there is little evidence of layer lines on any of the sloping surfaces suggesting that the Anti-Aliasing is at least partially effective. This has been dry assembled to check fit, and will be heading to the Netherlands.
 

Stevers

Western Thunderer
It's gardening season with nature rapidly unravelling any 'progress' made. However the Lion Class has been progressed to needing paint on wheels and chassis as covered on my Downton Train Crash thread, and I've been busy with the myriad problems of trying to print LSWR signal boxes as covered by my thread in that other place that pre-dates my arrival here.

DSC03637.JPG
Conventional wisdom seems to be that prints should be angled with the 'face' up. What to do though if a part needs to be fair faced all round?
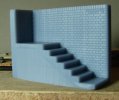
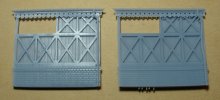
I'd printed the sides for 'West Moors' (a heavily modified LSWR Type 2 box) leaning back at 19°. Despite using knife edges the bottom was still slightly curved and the insides a bit rough from the fine grid of Blueprint Studio supports. The brickwork can be smoothed and then looks not unlike the slightly irregular painted brick seen in photos of the interior. However the ARP 'style' steps at West Moors needed a fair face all round, so I printed those vertically on supports and that came out very nicely with the brickwork well formed - shades of also being able to print my BR(S) smokebox plates vertically.

DSC03639.JPGDSC03643.JPG
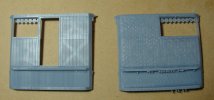
So when I tackled my Verwood box as it would have been originally, as a control I printed a test side at 19° leaning back (right), and then more in hope than anything else the same thing vertically (left) - though absolutely the wrong way up for the decorative valence! I was needless to say very pleasantly surprised! The valance did need tidying with a scalpel to remove some left over supports, but it was as good as it needed to be. The leaning back example was left to dry overnight before curing and as well as the curved bottom became very badly cupped and the drainpipe despite being restrained by pegs at 1mm intervals became detached, from which it could be inferred that parts can be too dry and too wet for curing! The less said about the interior the better!

DSC03631.JPGDSC03641.JPG
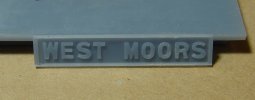
Flushed with with what passes for success round here, I kicked off the four hour print job to produce the original style 'fat' chimney more typical of LSWR Type 1 boxes, and produced the best attempt yet - very dimensionally accurate (straight in all planes) and fair faced all round. A problem now that it has printed so well, is that the effect of 'additive kerf' is clearly visible on the string courses, something also visible on the somewhat emboldened script for the West Moors signal box sign - printed 'flat' on supports.

Needless to say there is now a lot of painting to do in my immediate future - happily in the cool of that basement workshop...
 
Top