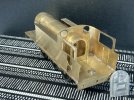
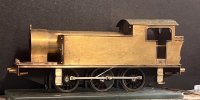
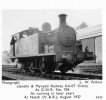
Llanelly & Mynydd Mawr Victory 704.

davey4270

Western Thunderer
I am in the process of building a 7mm model from an ancient Gateneal kit of the above locomotive. I know of only 3 photographs of this rather camera shy specimen and hope there are some more out there to help detail this poor quality and inaccurate model. The 3 pics I have are at Bury Port in L&MMR days, early GWR at Duffryn yard and later GWR with the roundel at Neath N&B.
Any further views would assist with detailing, particularly a rear view or a tank top view which would answer the question of if the space between the tank tops and the boiler was covered to prevent water ingress to the motion as on most GWR side tanks. A lot of pre grouping Welsh Railway locomotives didn't have this feature.

Thanks in advance,

David.
 

davey4270

Western Thunderer
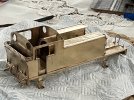
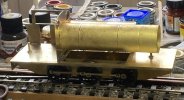
Progress so far. I’ve rolled the boiler although the formers are too small so new ones required, it fits in the location ring on the cab front spectacle plate and is just resting on the front chassis screw. One side tank attached and the chassis is fitted with Slater’s horn blocks on leading and centre axles with jointed rods using the easy option of splitting them on the centre crank pin.

IMG_4225.jpg
 

davey4270

Western Thunderer
The build was paused while the contract to construct a pair of 1366 class pannier tanks for the GWR was completed. See my blog elsewhere on this site.
Progress has been made but for some reason or other, I haven't been updating it on this site. Hopefully a brief summary with the pictures will suffice.

IMG_4261.jpg
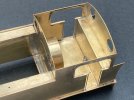
A rear view similar to my last post but showing that both tanks are now attached along with the firebox. This also shows that there is no inside to the tanks. There were narrow tanks fitted to the prototype and there was no covering plate between the boiler side and the tanks like with the GWR prairies so the gap is very visible. Also visible is the head of the screw passing through the firebox into a captive nut in the back of the boiler which holds it against the cab front.

IMG_4273.jpg
The cab rear/bunker front in place also showing a scratch built inner tank side and the etched circle on the cab front which locates the rear of the boiler.

IMG_4282.jpg
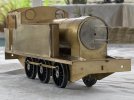
A front view with the model mounted on its free rolling chassis. This was set up with jointed rods and Slater's sprung horn blocks on the leading and central axles. The slightly oversize smokebox door will be replaced with a more accurate 3D printed specimen kindly supplied by Mike Morris of 88D Models.

IMG_4283.jpg
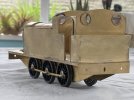
A rear view taken at the same time showing the bunker rear in place. This is the point in the build that it was paused to construct the pair of 1366 class panniers. See the blog elsewhere. A scratch built cab floor has also been added.

IMG_5868.jpg
During the construction of the 1366's advantage was taken to paint the frames, reassemble and motorise at the same time. A Taff Vale Models 18/33 type motor was fitted along with a Markits 40:1 gearbox. I also added the rear lamp irons at the same time as fitting the 1366 class lamp irons and while my soldering iron was hot, added the buffer housings. The cast firebox back head will permanently be glued into place after final painting of the model and will cover access to the rear boiler retaining screw when it no longer needs to be removed.
 

davey4270

Western Thunderer
I finally got round to making some progress on my ex Llanelly & Mynydd Mawr Railway Manning Wardle GWR704. Perhaps a quick update is necessary here as this model was placed pretty much on the back burner while a pair of 1366 class panniers (the twins) were constructed. 704 was mostly complete apart from detailing and obtaining some improved, the originals were atrocious, fittings. Several have been obtained, thanks to Mike Morris at 88D, so the resident spiders have been evicted and another start made. One problem that had been bugging me was the the roof was 3mm too narrow! This is a major component and is unacceptable. Exactly the same amount of work is necessary to etch it to the correct size as the wrong size! Anyway, a new piece was cut from some brass sheet, rolled and an inner frame fitted so that it will drop in place without any daylight showing through the join. The coal rails were folded up and soldered in place. one side was fractionally too long and the other fractionally too short. It was folded on the etched fold lines so done correctly. These are so flimsy that it was impossible not to fold on the etch lines. The 2 front tank/boiler infill pieces were made and soldered only to the boiler with top beading also added and a piece also made to repair the R/H tank top beading that was also etched too short. The boiler will be removable for painting. 4 lamp irons have been soldered to the front of the locomotive as well as 2 more on the side for spare lamps. The front footsteps have been fitted along with the 4 upper steps. 2 more were also fitted to the front of the tanks there being 6 of these needed but only 4 provided. No mention is made of these 6 steps in the instructions either.

IMG_7696.jpg
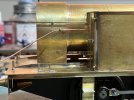
The strange fitting above the driven axle isn't part of the motion but a loose pick up wire. This picture shows the long roof overhang which clearly caused a problem with drifting steam from the safety valves. The second picture showing a home made cure to help any steam pass over the roof as well as GWR fittings.

IMG_7546.jpg
The buffer beam number (704) can just be made out along with the almost "S" shaped vacuum pipe standard. Would the 3 digit numbers have been central like a 4 digit or slightly offset to the right occupying spaces 2,3&4 of a 4 digit number? The GWR roundel is also faintly discernible. There also appears to be something in front of the cab side cut out. Is it the bottom of a sliding shutter or possibly a short handrail?
 

davey4270

Western Thunderer
There's a picture of 704 on the 88D website with the no. plate situated on the tank side - I would suppose that the same plate would have been moved to the bunker side at a later date?

Initially it had its Victory nameplate on the tank side replaced with its 704 number plate when absorbed by the GWR. Later it was “Swindonised” with a GWR safety valve, the tank/boiler sides plated over like the prairies and the number plates moved to the bunker sides which allowed a logo to be applied to the tank sides.
 

Paul Tomlinson

Western Thunderer
Initially it had its Victory nameplate on the tank side replaced with its 704 number plate when absorbed by the GWR. Later it was “Swindonised” with a GWR safety valve, the tank/boiler sides plated over like the prairies and the number plates moved to the bunker sides which allowed a logo to be applied to the tank sides.
Hi Davey, I was attempting to answer your query about the format of the 3-digit plate, which from the photo appears centralised, with the initials "G W R" faintly visible, which I think was applied to absorbed engines?
 

davey4270

Western Thunderer
Thanks Paul. I think I’ll go with the centralised buffer plank numbers. Do you think it looks like the yellow, not gold, GWR roundel? I’m presuming this unless another picture turns up.
 

Paul Tomlinson

Western Thunderer
Thanks Paul. I think I’ll go with the centralised buffer plank numbers. Do you think it looks like the yellow, not gold, GWR roundel? I’m presuming this unless another picture turns up.
Hi. TBH I thought you were asking about the cast plate, not the buffer beam. I've just had a look at my go-to site, where Ian Rathbone says the buffer beam numbers were centrally placed between the hook and the buffer, and this page from the same site indicates the roundel should be gilt... HTH


davey4270

Western Thunderer
Does brass harden with age? I managed to bend??? one drill bit and break another as they seem to hardly scratch the surface. I marked out the holes for the GWR style replacement handrails and also the L/H oil feed pipe into the smoke box. I used a 4mm handrail knob for the fitting.
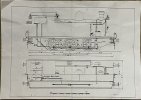
I’ve also attached the highly detailed Gateneal instructions for your perusal.

IMG_7712.jpeg
Obviously, neither wire is attached yet.

IMG_7713.jpeg
Unfortunately, no details of the GWR modifications.

IMG_7714.jpeg
 
Last edited:

timbowales

Western Thunderer
I too have bent a drill bit without it breaking, mind you it was a Chinese cheapie bought through a certain well known online marketplace. I subsequently avoid any overtly Chinese cheap drill bits, proves you get what you pay for
Tim T
 

davey4270

Western Thunderer
I too have bent a drill bit without it breaking, mind you it was a Chinese cheapie bought through a certain well known online marketplace. I subsequently avoid any overtly Chinese cheap drill bits, proves you get what you pay for
Tim T
I've broken many in the past but these weren't cheap, supposedly titanium coated. The newer drill bits don't seem to be particularly sharp.
 

adrian

Flying Squad
Does brass harden with age?
To the best of my knowledge no it doesn't. I've worked with brass kits decades old and they are still ductile. The principle cause of brass hardening and one of the reasons I hate it as a sheet material is work hardening. As soon a you start bending or forming brass it will harden.
 

davey4270

Western Thunderer
To the best of my knowledge no it doesn't. I've worked with brass kits decades old and they are still ductile. The principle cause of brass hardening and one of the reasons I hate it as a sheet material is work hardening. As soon a you start bending or forming brass it will harden.
Interesting, all the areas I’ve had problems with have been bent. Eg the smoke box wrapper.
 

Genghis

Western Thunderer
Brass doesn't age harden, but as Adrian points out, it certainly work hardens. Brass etches are usually produced from brass that has come form a roll - possibly even a cold rolled strip - and as such is work hardened to a degree as it is flattened. The problem gets worse as you near the centre of the roll. Annealing brass - heating it to red hot and then cooling - softens it but may result in the part deforming as the internal stresses are relieved.
 

simond

Western Thunderer
And the other side of that particular see-saw; I purchased some laser cut frames for locos, and they are dead soft. Not a problem, but quite a surprise. The hardness of typical etched brass is, I guess, what I was used to, and expecting.
 

davey4270

Western Thunderer
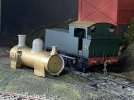
Apologies ladies and gentlemen for not keeping this blog updated. The completion of the twins 1369 & 1371 has distracted me somewhat and a delay in obtaining parts to complete this model hasn't helped. However, the body has been painted while I have finally completed the boiler. This will hopefully be painted along with the chassis of current project TROJAN (see elsewhere for its build).

IMG_7843.jpg
A nicely cleaned body ready for priming.

IMG_7844.jpg
Primed and a coat of matt black.

IMG_7976.jpg
The black areas were masked off and a coat of green applied.

IMG_8148.jpg
Red buffer planks and the boiler inserted. I have modelled the locomotive in its final condition as photographed outside the N&B Neath shed. The gap between the side tanks and the boiler had been plated over as with prairies. Visible at the tank front is a piece of this sheeting. This has been soldered to the boiler and will be painted as it is attached to the boiler.

IMG_9109.jpg
Mike Morris aka 88D Models kindly supplied a set of 3D printed fittings from his own kit to replace the quite awful white metal fittings supplied with the kit. Just visible in pictures of the prototype is a rivet strip on the roof. Julian Wynn of Taff Vale/Dragon Models has kindly supplied me with a suitable etched strip for this. It is a rather large roof and needs something to break up a plain flat area.
 

davey4270

Western Thunderer
An up to date picture of the camera shy ex L&MMRly GWR704. Hopefully I’ve acquired all the replacement components and with some minor work it can be handed over to Dai the Paint. The cab roof will need a rivet strip added and the 3D printed dome will need some attention to the sides at the base. These were so fine that they broke off when it was being Araldited in position. The replacement GWR safety bonnet was obtained from Ragstone Models, thank you Andy.

IMG_9745.jpeg
 
Top