Layout of a lifetime - workshop build

Mabel

Member
Thanks for the positive comments chaps.
Adrian; Re the etch primer, I have never used any so can't advise. The only PE stuff I use is small detail parts on armour kits or detail parts on locomotives. I rarely use any type of primer at all to be honest. Just my preference. In my early days of using Vallejo products, I had a some of issues with paint coming off plastic models just with handling them. Especially if I had used masking tape for example. I now just make sure that the item to be painted is properly clean and dry, and wear the dreaded vinyl gloves when handling anything to be painted. I prepare any area to be painted with Isopropyl, letting it vent/evaporate fully before painting. If I'm painting component parts of a kit at several stages of the build, I try to let the paint cure properly before excessive handling. I just pop all the painted parts in a takeaway style container and put to one side, hoping that impatience doesn't get the better of me!

Yorkshire Dave; You are possibly in the right part of the country for Boyes stores. Twice a year they have either 20% off their Vallejo range or buy 2 get one free. I just ask the manager in my local store when the next offer is due. They are normally happy to oblige.

Suffolk Dave; nice to know they have added some more colours to the Model Color range (my preferred paint). There were some gaps in the range that I previously filled with the odd bottle of Model Air. I don't really get on with Model Air. I feel like I have to apply quite a few coats to achieve a decent depth of colour.

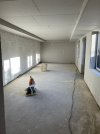
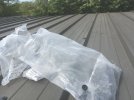
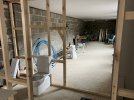
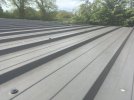
After a 12 month hiatus of modelling, my purpose built garden room for the 'layout of a lifetime' with 'the best modellers permanent workbench ever' incorporated within is 99% complete. Just waiting for the carpet fitter now. Watch this space :)
 

Mabel

Member
Already thought of that. Laminate flooring in my workbench area ;) We have even fitted gas central heating completely independent from the house.... lucky bu**er aren't I?
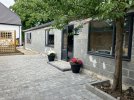
 

Mabel

Member
I can do a write up of the whole project including costs if anyone is interested? It has been built out of block with cavity wall insulation and double glazing, just like a house/bungalow. Apologies for the thread hijack by the way...
 

Attachments

  • BF440564-F217-4728-9ACE-A84D146BF16E.jpeg
    BF440564-F217-4728-9ACE-A84D146BF16E.jpeg
    375.4 KB · Views: 76
  • 319D3038-F7DA-44AB-8342-998AF60DB2D8.jpeg
    319D3038-F7DA-44AB-8342-998AF60DB2D8.jpeg
    234.1 KB · Views: 77

Mabel

Member
Thanks for moving my thread Adrian.

For those just joining, this is going to be a diary of how my wife and I built a home for my retirement layout of a lifetime, with associated costs. I hope this may prove helpful to anyone considering similar. It will be an occasional blog as my accompanying photos are spread across 3 devices.

I must add that this is how my wife and myself built our railway & craft room in the garden. It is not necessarily the best way or the correct way, but it worked for us. We did everything except lay the blocks and plaster the walls.

We decided on a building in our garden rather than converting the loft as we are not getting any younger and the thought of getting the construction materials up into the loft would be taxing enough, let alone having the will to climb up there whenever we wanted to craft (my wife) or for me to build my railway. We looked at many ideas, from fancy garden sheds, to log cabin kits, to a redundant Portacabin from Cadwell Park race circuit. All ideas had their pros and cons. The main concern for us was anything built out of timber will need maintenance (or even a partial rebuild) during our expected lifetime. This was a major consideration. Not only would we be approaching our 80s by this point (and unable to do the work ourselves), it has a cost implication that we wouldn't want at that time of life. There is also the lack of security for our hobby equipment within any kind of wooden building. There was also the conundrum of how to heat & ventilate which ever building we chose. My wife is a paper crafter so her craft room would need to have a relatively stable atmosphere, which is a bonus for the model railway room too.
After many considerations and much research over nearly two years, and a chance conversation with a local builder, we finally decided on a bricks and mortar cavity walled structure with upvc double glazing to match the house,
with my wife and myself doing most of the donkey work. We now have a building that measures 63 ft x 14ft that cost considerably less than the quotes for smaller timber buildings, and it was completed under the Permitted Development scheme. So no costly planning application. For those that have never heard of this scheme, it is a set of planning rules implemented by central government rather than your local authority. They are unambiguous and fairly easy to understand. Your local authority generally will provide a 'checking service' for a set fee if you are unsure of any aspect of your project.

The basic costs were;
Concrete for the floor slab: £3200

Block built Cavity wall (built to current regs) . The block layers supplied the blocks, brick ties
and sand and cement: £4600

Rockwool cavity insulation: £1000
(Approximate figure. I will check the invoice at a later date as I am at work at mo)

3 x huge double glazed windows (yes, the ones in the photos) £100ea
1 compsite front door and frame £140
1 set French doors and frame
£150
All new but were miss-measures from a local double glazing company.

The roof was done with insulated corrugated interlocking panels. (Like modern supermarkets or industrial units are built from).These were seconds from a local manufacturer. : £2800
Because of the building height constraints in Permitted Development, I had no option but to have a pent roof. (Flat but sloping in plain English). The roof panels are insulated with 140mm closed cell foam, faced with a white coated metal panel. They give an instant clean look and no further finishing is necessary. See attached pic....

Circa £12,500 for a weather and water tight secure building.

So, that is the back story. Any questions along the way, just jump in.152F9AEA-51B4-41EA-B258-1FA28E04FFDD.jpeg
 
Last edited by a moderator:

Osgood

Western Thunderer
Brilliant, that seems a great way to achieve the space most can only dream of.

Heating? Humidity?
I've found that so long as humidity is controlled (just basic dehumidifiers draining to outside), the temperature variation if left unheated doesn't seem to cause any issues.

I'm very interested in your use of the interlocking insulated panels for roof construction.
Can you provide more on the roof construction please - nature of the panel top surface, any covering over this?
I take it there is no additional support for the sheets, so a non-walk roof?
I have been considering the use of thinner (maybe 80 or 100mm) panels for insulating a pitch-roofed rubberoid / pantile roofed outbuilding - essentially using them to create a flat ceiling beneath the trusses and internally cladding an external timber stud wall.
They reckon there would be no sag even with the thinner sheet over 4.5m span if supported only at ends.
The ones I'm looking at are usually referred to as 'cold store walling' panels, smooth both sides.

Thanks.
 
Last edited:

Mabel

Member
Brilliant, that seems a great way to achieve the space most can only dream of.

Heating? Humidity?
I've found that so long as humidity is controlled (just basic dehumidifiers draining to outside), the temperature variation if left unheated doesn't seem to cause any issues.

I'm very interested in your use of the interlocking insulated panels for roof construction.
Can you provide more on the roof construction please - nature of the panel top surface, any covering over this?
I take it there is no additional support for the sheets, so a non-walk roof?
I have been considering the use of thinner (maybe 80 or 100mm) panels for insulating a pitch-roofed rubberoid / pantile roofed outbuilding - essentially using them to create a flat ceiling beneath the trusses and internally cladding an external timber stud wall.
They reckon there would be no sag even with the thinner sheet over 4.5m span if supported only at ends.
The ones I'm looking at are usually referred to as 'cold store walling' panels, smooth both sides.

Thanks.
I have been dreaming of this space for at least 30 years! A house move at the right time (and place) helped it to fruition.

I have looked at dehumidifiers, but hopefully, because of our construction method, they won't be needed as the room will function the same as a house. Heating was a must though! I plan on using the place 12 months of the year, in plenty of comfort :)

The roof is constructed from Kingspan Quadcore (other similar brands available). There are numerous re-sellers on eBay country wide selling both seconds and new panels. The outer surface is a very durable plasticote. It comes in a huge range of colours too. Very simple to fit, and light enough to be lifted on to your roof by two blokes. Whilst they are not SiP (structural insulated panels), they are more 'Rigid' insulated panels and as such are solid to walk on. My roof is a 4.4m unsupported span and is completely rigid to walk on. In fact, for reasons I will go into later in the build diary, my ceiling is now plastered. I have walked on the roof numerous times without any cracks to the plastered ceiling. The capability to take your weight will obviously depend on how thick the panels are. We have another workshop with the same roof of a similar unsupported span, with either 80 or 100mm thick panels (I can't remember off the top of my head). They are just as rigid as the 140mm panels over the railway room.
My supplier is only in the next village. If you have a specific span & depth of insulation in mind, I can pop along and ask the question re the ability to support your weight, This is usually accompanied by a demonstration in his yard :)
I have just started my last night shift, but tomorrow, when I resurface, I will put some photos up of my finished roof (from the bedroom window so you can see it's aesthetics) and some photos of consumables needed to fit the panels with the cost. Anyone considering a similar building, even a wood framed building, would do well to compare prices with this product. The cost of timber these days is astronomical. Once fitted, there is no further maintenance required.
 

Mabel

Member
Brilliant, that seems a great way to achieve the space most can only dream of.

Heating? Humidity?
I've found that so long as humidity is controlled (just basic dehumidifiers draining to outside), the temperature variation if left unheated doesn't seem to cause any issues.

I'm very interested in your use of the interlocking insulated panels for roof construction.
Can you provide more on the roof construction please - nature of the panel top surface, any covering over this?
I take it there is no additional support for the sheets, so a non-walk roof?
I have been considering the use of thinner (maybe 80 or 100mm) panels for insulating a pitch-roofed rubberoid / pantile roofed outbuilding - essentially using them to create a flat ceiling beneath the trusses and internally cladding an external timber stud wall.
They reckon there would be no sag even with the thinner sheet over 4.5m span if supported only at ends.
The ones I'm looking at are usually referred to as 'cold store walling' panels, smooth both sides.

Thanks.
Just re read this post. I have seen the cold store panels. The chap I buy my roof sheets from sells these also. I would imagine that they will be rigid enough to use as a ceiling in your application, but I don't have any personal experience of them other than seeing them stacked in a yard for sale. They will be absolutely fine for internally cladding a timber stud wall. It will make for a quick, clean and robust interior wall.
 

Osgood

Western Thunderer
Thanks, actually I looked at Quadcore only very recently as I was trying to find a manufacturer of 3"" corrugated profile insulated sheets - but amazingly nobody does it, only box profile or 7" corrugated :confused:

Have you sorted the heating yet?
If not, and given the ceiling is plastered (how on earth did you manage that with the steel surface of the roof sheets?) this might be an ideal application for infra red mats built into the 3mm plaster coat - albeit at the cost of putting another coat of plaster coat on.
 

adrian

Flying Squad
For those just joining, this is going to be a diary of how my wife and I built a home for my retirement layout of a lifetime, with associated costs. I hope this may prove helpful to anyone considering similar. It will be an occasional blog as my accompanying photos are spread across 3 devices.
Extremely interested as will without a doubt be considering something similar. My wife is very much into crafts and aiming to retire next year, kids are flying the coop so will be planning something exactly like this. Last year I spotted a house in Dumfries with an ex-veterinary practice attached that would be perfect for conversion into a craft centre and railway modelling workshop. So will follow with interest - thanks for posting.
 

Mabel

Member
Thanks, actually I looked at Quadcore only very recently as I was trying to find a manufacturer of 3"" corrugated profile insulated sheets - but amazingly nobody does it, only box profile or 7" corrugated :confused:

Have you sorted the heating yet?
If not, and given the ceiling is plastered (how on earth did you manage that with the steel surface of the roof sheets?) this might be an ideal application for infra red mats built into the 3mm plaster coat - albeit at the cost of putting another coat of plaster coat on.
Probably the only reason you will find box profile or huge corrugation sheets is because they are intended for commercial use Im guessing.

Yes, the heating is in.
The whole project is 99% finished. Just waiting for my carpet fitter in a few weeks, then ultimately have the exterior walls rendered to match our house. I have gone back 2 years to start the diary from the beginning really.
So back to the heating. We opted for a Lpg Combi boiler the same as the one fitted in our house.
We installed a 1200 litre underground Lpg tank in our front garden two years ago to power our house Combi boiler. (I will own up at this point to owning a JCB 3CX. Long story.......). The alkathene supply pipe from the tank runs down the side and back of our house to reach the house boiler.
After exhausting many options and much research (to heat the craft & railway room) we asked the installation team to come back and Tee off a supply into the craft room. We dug the trench (luckily we had photographed and measured the original supply trench as we dug that also, 2 years previously), so the team just had to supply a few metres of pipe, a connection, and plastic weld it. They checked the trench depth met the requirements. Watched me cover the new pipe with sand and warning tape, then signed it off. It wasn't expensive. I think it was about £100.
Whilst fitting a new Combi and central heating radiators may seem like an extravagance (it is!), we do plan on spending a lot of our retirement in there.
To maximise our budget, we bought most radiators from eBay. We were choosy, buying only nice rads and relatively close to home. We bought them over a two year period. There were only 2 radiators bought new. I have 6 in the railway room, my wife has 3 in her (smaller) craft room. We did all of the pipe work ourselves using JG Speedfit push fit fittings. Again, this was done to keep the cost down. We had to have the boiler installed professionally, checked it was gas tight, and connect to our heating pipe work to get the 'gas safe' certificate. Because we did most of the donkey work, the installation cost was minimal.

We ended up plastering the ceilings in both rooms. I will explain why (with photos) a bit further in the diary. It was a relatively easy task. We plaster boarded the ceilings, attaching them with Drywall screws. They self tapped straight into the metal ceiling.
 

Attachments

  • 77EAEA97-05BB-47D3-9948-EB4C2729E603.jpeg
    77EAEA97-05BB-47D3-9948-EB4C2729E603.jpeg
    89.5 KB · Views: 49
Last edited:

Mabel

Member
Extremely interested as will without a doubt be considering something similar. My wife is very much into crafts and aiming to retire next year, kids are flying the coop so will be planning something exactly like this. Last year I spotted a house in Dumfries with an ex-veterinary practice attached that would be perfect for conversion into a craft centre and railway modelling workshop. So will follow with interest - thanks for posting.
Adrian, once they fly the nest.... don't let them move back in!! :)

Sounds like a fab property in Dumfries. We were looking for something similar (inspired mainly by Graham Nicolas' Grantham layout built in a retired chapel attached to his home) when we were house hunting.
Everyone's requirements will be slightly different for their craft and/or railway room. Comfort, warmth, ease of access and security were our main stipulations.
I hope my build diary ticks some boxes for you.
 

Osgood

Western Thunderer
Probably the only reason you will find box profile or huge corrugation sheets is because they are intended for commercial use Im guessing.

....
I reckon you're right - problem is they just don't look right on wartime heritage buildings and are such an easy way to insulate buildings :rolleyes:

Going back to the internal view in post 6 - I wonder if I might have allocated the space a little differently?
I mean what is wrong with a longer thinner craft room?
That would have allowed a full-length layout.... :)

Then again, maybe your wife drives the JCB and does the plastering - in which case you should probably be grateful the area allocated to the railway room is greater than the crafting area! :))
 

Mabel

Member
I'm very interested in your use of the interlocking insulated panels for roof construction.
Can you provide more on the roof construction please - nature of the panel top surface, any covering over this?
I take it there is no additional support for the sheets, so a non-walk roof?
As promised, here are some photos of the completed roof showing the plasticote finish. The extra long self tapping screws (175mm in my case) secure the sheet to your wall plate. They are about £40 for a bag of 100. Obviously the thinner the roof sheets, the shorter (and cheaper) the fixing screw. The next picture shows the seam after the sheet has been overlapped onto its already fixed neighbour. A line of mastic is attached to the ridge before plonking the new sheet overlap on top. These small self tapping fixings are called 'stitchers' in the trade. Approx £20 a pack. Finally is the all important tolerance fit, colour coded screw cap.
All of my fixings, mastic on a roll and advice came from Jacksons of York (Stockton on the Forest). They are primarily a commercial building manufacturer but are happy to sell the consumables from their office.
 

Attachments

  • 160DBA5E-CAA5-4187-A2AC-9B68D0011495.jpeg
    160DBA5E-CAA5-4187-A2AC-9B68D0011495.jpeg
    176.1 KB · Views: 37
  • A083A9E4-D2F2-4860-906C-74BA6D1FF7E2.jpeg
    A083A9E4-D2F2-4860-906C-74BA6D1FF7E2.jpeg
    138.3 KB · Views: 37
  • D64BF85D-5CBB-4425-B85A-2636D830C5E6.jpeg
    D64BF85D-5CBB-4425-B85A-2636D830C5E6.jpeg
    140.3 KB · Views: 34
  • 8F6A6D2D-950F-41BE-8E9A-6B4543751B66.jpeg
    8F6A6D2D-950F-41BE-8E9A-6B4543751B66.jpeg
    164.7 KB · Views: 37

Osgood

Western Thunderer
Many thanks. Certainly looks a neat job. How did you make the eaves edge rodent-proof?
One immediate outside application I have is a flat covering of an artic trailer roof (being only 8ft wide, if the sheets go across the run-off is not an issue )- the biggest cost will be making up flashings to keep rodents out of the ends of the sheets.
More research needed.
 

Mabel

Member
My wall plates were used scaffold boards fixed directly to the top of the block work spanning the cavity. Purely for ease of fitting (for me). I opted for a line of soffit vents in the top course of my block work at the time of construction, to let the cavity breathe. I attached a 3"x2" tanalised fence rail to the boards along the front of the building. This gave me 2" of fall from front to back. I fixed the roof sheets directly onto the timber with a bead of mastic in the joint.
My method was discussed with the guys who built the walls, and they thought it would be fine. I had already bought the scaff planks in advance as they were cheap, so was committed. The building is in its 2nd year now and there are no damp or condensation issues. There is definitely air flow at my eaves. When I remove one of the recessed light fittings from my light boxes built into the ceiling I can feel the draught.
Flashings can be bought from companies that sell the panels. I bought mine (mostly for decorative finish) from Jacksons in Stockton on the Forrest, York. I don't know where you are in the country, but there will be similar companies near you.
 

King Crab

Western Thunderer
The thing about roofs is not just keeping it up, but also keeping it down!

So not only do you need to get the structure right to span between the walls, it's also important to stop the roof blowing away in a gale! On a traditional roof with massive timbers and tiles, the weight of the roof might just be sufficient to combat any uplift. But on a 'lightweight' roof, holding it down becomes an issue.

If the roof is well fixed to the wallplate, the wallplate then needs to be firmly held down to the wall. The usual solution is steel holding down straps fitted, like hockey sticks, to run over the wallplate and down the wall. Importantly, these straps come down, say three block courses, and then are securely fixed into each course, say plug and screw.

All decent builders merchants sell these straps, they come ready galvanised and predrilled with holes. They are typically about 30mm wide, and about 1 metre long. I can see Travis Perkins have them at about £8.50 each.

PK
 
Top