3mm Workbench: Scratch-building a chassis for a J50

Thread Contents
  • BetweenTheTunnels

    Active Member
    I've put this post here to try and help myself (and others) in finding things in the future. Assuming all plans reach fruition, there's a lot of model building to do over the next few years, aside from the layout, so hopefully by referencing the start of work each kit/scratchbuild/trackwork on here, we might even be able to find things in the future!

    Thread Contents
    Wagon No. 1 - 3mm Society/Parkside GWR 'Mogo' (Started/Finished: 19th Feb 2023)

    Carraige No. 1 - Worsley LNER Teak D.43 Full Brake (Started: 23rd Feb 2023)
     
    Last edited:
    GWR Mogo Two-Axle Box Van (W01)
  • BetweenTheTunnels

    Active Member
    Evening all,
    Well pleased to say the Humbrol Liquid Poly turned up this afternoon, so tonight has seen my first bit of 3mm scale modelling undertaken! Im sure many people have built plastic kits before, so i'll not do a 'blow-by-blow' account, except to say there are a couple of 'finishing off' items to be done - I need to acquire replacement buffers when the 3mm Society Shop is available, and some 14.2mm wheels. The roof needs painting white (I think) before being attached, and it also wants some liquid led weight inside it to weight it a bit.

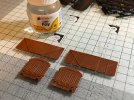
    So... at 19.45pm I started with this ...
    IMG_3091.jpeg

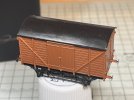
    and at 21:10 concluded with this ...
    IMG_3113.jpeg

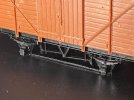
    Really impressed with the kit - not surprising as its made for the society by Parkside i think. Easy to go together, very nice finish and very little flash to be cleaned up on the moudlings. Each only needed very minor dressing to sit right. I also think that the level of 'easily applied' detail on the underframe is superb.

    IMG_3108.jpeg

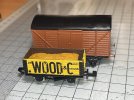
    This has also confirmed to me that there is a really nice size to 3mm modelling - compared with a five-plank N gauge wagon here ... the height isnt a fair comparison as the Mogo doesnt have wheels.

    IMG_3117.jpeg

    Overall very impressed and its confirmed that I think i might finally be on the right road.

    Richie
     
    Last edited:
    Gresley D.43 Full Brake - Build Underway
  • BetweenTheTunnels

    Active Member
    This is a somewhat interesting comparison to the wagon kit. For starters its etched brass, rather than plastic, so solder rather than glue. Its also a Worlsey Works etch so more of a scratchbuilder helper than a kit, with no instructions. The Worsley Works etches, im told, follow the Comet Coaches way of building, an a friend has given me some help with some info on those, but is obviously not a book. I need to order the appropriate item from Wizard Models.
    IMG_3128.JPG

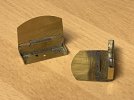
    However, I have managed to extract the inner ends sections that fold up and form the connection between the floor and body, and laminated these to the coach ends. To be honest I've done very little etched brass work in the past, so the soldering to me looked quite neat. Still a bit too much on the iron I think, but its all a learning curve. So we are underway! The next task will be to solder the window frames and vents on to the bodyside I think.
    IMG_3125.JPG

    In other news, as they say, I've now placed an order with Worsley Works for a BR Mk1 coaches, due in a few weeks when the etches are back in stock, and an order is about to go into the 3mm Society for 14.2mm wheelsets, some wagon kits and some rail. Nice to say things are slowly moving forwards, i've come up with a little 'dog bone' shaped test track, and got it designed in Templot. It might not be scenified, and it is something of a tail chaser, but it is primarily for testing locos, running in chassis and giving me somewhere to play run trains to start with, rather than being a proper prototypical layout - that will follow in due course!

    Richie

     
    Last edited:
    J50 Chassis Query
  • BetweenTheTunnels

    Active Member
    I have been giving some thought in recent days to the chassis for the J50. I have acquired the white metal J50 body from 3SMR (although I have had it taken off me as it's a Christmas present apparently!) which includes various chassis components. Now I could use them, but why go the easy way :)

    The opinions of those reading and following along would be welcomed, but I have this idea about creating a chassis by milling it out of brass bar. I have access to a small milling machine, and my idea is that the brass bar would give plenty of low down weight. The intention is to power it from a 8mm cordless motor, running through spur gears to a worm on the axle. My idea being to create a smooth running chassis that is well weighted. While a fair amount of inner section of the brass bar would need to be milled out for the gears and access to the back of each frame side, I still think it would be heavier than etches.

    It would probably need to be milled in two halves and wiper pick-ups would need to be added - the wheels have a metal tyre and plastic inner so are electrically separate from the axle. I am debating about the bearings and axle boxes. My original thought was to use High Level Kits Hornblocks (the axles are 1/8") which I concluded I could still use with a milled chassis, but now I am wondering is normal 2mm style bearings in a slightly elongated hole, with a springy wire pressing down on the inside would be better/as good? I'd like to think I can create a standard way of creating chassis - and as I may need a few similar locos for the 'grand plan' (if it happens!) a chassis that is repeatable sounds a good idea.

    But does anyone have any thoughts? Is the whole thing a bad idea, or has it been done before? I am assuming I am not trailblazing a new path here, although I haven't seen many (if any) other milled chassis?

    Id welcome anyones views, thoughts, comments, (polite!) suggestions, advice. This is all new to me, so please feel free to tell me I am going about it the wrong way and be constructive as to the way forward....

    Richie
     
    Top