You are using an out of date browser. It may not display this or other websites correctly.
You should upgrade or use an alternative browser.
You should upgrade or use an alternative browser.
Dan's Workbench - D1031 Western Rifleman
- Thread starter Dan Randall
- Start date
Dan Randall
Western Thunderer
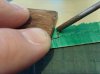
I found some time to do a little more work on the Western today and on consulting my list of outstanding jobs, decided to have a go at the cab front handrails. I found the ones beneath the windscreens particularly challenging, but I got there in the end. Here are the handrails awaiting installation....
[attachment=5:2tj0qarm]SNV33317.JPG[/attachment:2tj0qarm]
All done....
[attachment=4:2tj0qarm]SNV33318.JPG[/attachment:2tj0qarm]
[attachment=3:2tj0qarm]SNV33319.JPG[/attachment:2tj0qarm]
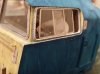
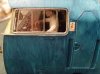
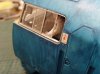
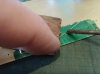
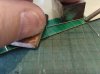
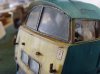
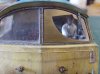
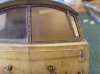
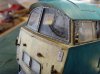
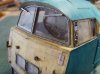
Having crossed that job off the list ( ), I thought it was time to bite the bullet and start installing the cab side windows. These are stainless steel etches from my own artwork, Araldited (several months ago!), to real glass cover slips and at only 0.18mm thick, you have to handle them carefully! I decided it was best to fit the rear, inboard windows first.
They need to be an interference fit in the window aperture and I managed to break the glass in two of them whilst attempting a minute tweak to the positioning. Of the two remaining rear windows, the frame on one of them was found to have not fully stuck to the glass, so needless to say, I was very careful with the one remaining useful one.
 ")
Anyway, I managed to get it positioned properly in the end and ran a very small bead of canopy glue behind the frame, top and bottom, which will hopefully make it stay put. Here are a few piccies and just for effect, I've rested the front outboard window in the aperture too....
[attachment=2:2tj0qarm]SNV33320.JPG[/attachment:2tj0qarm]
[attachment=1:2tj0qarm]SNV33321.JPG[/attachment:2tj0qarm]
[attachment=0:2tj0qarm]SNV33322.JPG[/attachment:2tj0qarm]
I couldn't be bothered to knock up any Araldite today, so the repairs (and installation of the other frames), will have to wait.
That's all for now.
Regards
Dan
[attachment=5:2tj0qarm]SNV33317.JPG[/attachment:2tj0qarm]
All done....
[attachment=4:2tj0qarm]SNV33318.JPG[/attachment:2tj0qarm]
[attachment=3:2tj0qarm]SNV33319.JPG[/attachment:2tj0qarm]
Having crossed that job off the list (
), I thought it was time to bite the bullet and start installing the cab side windows. These are stainless steel etches from my own artwork, Araldited (several months ago!), to real glass cover slips and at only 0.18mm thick, you have to handle them carefully! I decided it was best to fit the rear, inboard windows first.They need to be an interference fit in the window aperture and I managed to break the glass in two of them whilst attempting a minute tweak to the positioning.
Of the two remaining rear windows, the frame on one of them was found to have not fully stuck to the glass, so needless to say, I was very careful with the one remaining useful one. Anyway, I managed to get it positioned properly in the end and ran a very small bead of canopy glue behind the frame, top and bottom, which will hopefully make it stay put. Here are a few piccies and just for effect, I've rested the front outboard window in the aperture too....
[attachment=2:2tj0qarm]SNV33320.JPG[/attachment:2tj0qarm]
[attachment=1:2tj0qarm]SNV33321.JPG[/attachment:2tj0qarm]
[attachment=0:2tj0qarm]SNV33322.JPG[/attachment:2tj0qarm]
I couldn't be bothered to knock up any Araldite today, so the repairs (and installation of the other frames), will have to wait.
That's all for now.
Regards
Dan
Attachments
Dan Randall
Western Thunderer
Scale7JB said:Spectacular, especially the little handle on the window frames...
Will you chemically blacken those handrails to save priming them with nasty thick primer?
JB.
Thanks JB.
Although they're supposed to be bare metal, I will be doing something along those lines, as they're a bit shiny at the moment.
Looking through a few Western books earlier, I noticed that the handrails seem to be the same colour as the windscreen surrounds (aluminium?). My windscreen surrounds are painted with a metallic silver paint, which doesn't look as much like metal as I'd hoped for. The paint is actually quite dull, but given that the rest of the loco is destined to look pretty shagged, it's probably not such a bad thing really. :lol:
The handrails are superglued in now, but with hindsight, I should have made them from tinned brass wire. This would have been much easier to form than nickel silver and the dullness of the solder would have better matched the window frames I reckon. At least Cynric won't have to make the same mistake.
Regards
Dan
Dan Randall
Western Thunderer
It?s been a while since my last update, though I?m not sure why really!
Anyway, I?d recently fitted the handrails to the cab fronts, but something was niggling me about them. It finally dawned on me that they looked a bit chunky when compared with prototype photos, especially the low level staple shaped ones.
I read the instructions again ?make front handrails from 0.5mm nickel silver wire?. I measured mine and they were 0.7mm?. Drat and double drat! I had a route around in the box, but there was only 0.7mm in there (which is used for the cab side handrails). I guess I should have cottoned on when I had to enlarge all the holes in the cab fronts? :scratch: I had to fill them all with Milliput and re-drill them?. :x
I ordered some of the elusive 0.5mm wire from Eileen?s and having got this in my mitts in a very short space of time (great service ), I was able to get stuck in again.
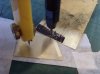
I must have got lucky when I made the first handrails, as I managed to make the two long ones under the windscreens pretty quickly. I wasn?t so lucky this time and after binning loads of duff ones (and seeing myself having to order more wire if I wasn?t careful), I decided a jig was in order.
It?s nothing special, but I had two good handrails in two attempts, so it's served its purpose. I found a strip of thick brass in my spares box and having worked out the width of the handrails and the approximate angle of the cab front, I drilled three holes and soldered in some wire pegs?.
Anyway, I?d recently fitted the handrails to the cab fronts, but something was niggling me about them. It finally dawned on me that they looked a bit chunky when compared with prototype photos, especially the low level staple shaped ones.
I read the instructions again ?make front handrails from 0.5mm nickel silver wire?. I measured mine and they were 0.7mm?. Drat and double drat! I had a route around in the box, but there was only 0.7mm in there (which is used for the cab side handrails). I guess I should have cottoned on when I had to enlarge all the holes in the cab fronts? :scratch: I had to fill them all with Milliput and re-drill them?. :x
I ordered some of the elusive 0.5mm wire from Eileen?s and having got this in my mitts in a very short space of time (great service
), I was able to get stuck in again.I must have got lucky when I made the first handrails, as I managed to make the two long ones under the windscreens pretty quickly. I wasn?t so lucky this time and after binning loads of duff ones (and seeing myself having to order more wire if I wasn?t careful), I decided a jig was in order.
It?s nothing special, but I had two good handrails in two attempts, so it's served its purpose. I found a strip of thick brass in my spares box and having worked out the width of the handrails and the approximate angle of the cab front, I drilled three holes and soldered in some wire pegs?.
Attachments

Dan Randall
Western Thunderer
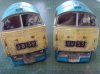
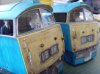
I had a good session on ?Rifleman? yesterday, tackling the last main job, before assembly of the cabs and body can commence.
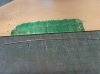
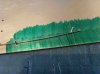
I wanted to replicate where the windscreen wipers had done their work in the grime and decided yet another jig was called for. I shaped a piece of 12 thou fret waste to be a snug fit in the windscreen apertures and having put a wiper temporarily in place, added some strips from the gummed portion of a Post-it Note at the extent of the wiper blade?s travel?.
I wanted to replicate where the windscreen wipers had done their work in the grime and decided yet another jig was called for. I shaped a piece of 12 thou fret waste to be a snug fit in the windscreen apertures and having put a wiper temporarily in place, added some strips from the gummed portion of a Post-it Note at the extent of the wiper blade?s travel?.
Attachments
Dan Randall
Western Thunderer
(Continued)
Having left this to dry for a while, the template was then taped in position on each windscreen in turn before dragging a piece of fine flexible styrene (the same length as the wiper blades), through the aperture in the template to give this?.
Having left this to dry for a while, the template was then taped in position on each windscreen in turn before dragging a piece of fine flexible styrene (the same length as the wiper blades), through the aperture in the template to give this?.
Attachments
Phill Dyson
Western Thunderer
Love the streaking effect  #
#
Phill
#Phill
D1054
Western Thunderer
Good stuff, Dan. I really like that effect and will try it out on Monitor. Are you rigging up the fans next before you put the roof on? If so, I'd be really interested to see how you're doing it I made a brass frame on Governor, with a couple of universal joints linked to a central motor. Works ok, but I made a major boob on which side the worm drives the gears and I've ended up with contra-rotating pairs of fans at each end when I'm pretty sure they all should all rotate the same way!  No-body seems to notice (or are too kind to point it out), but I want to get it right on Monitor and it'll be the first thing I tackle... If you are having working fans, can you share how you're doing them m8? :wave: Cheers, Ian.
I made a brass frame on Governor, with a couple of universal joints linked to a central motor. Works ok, but I made a major boob on which side the worm drives the gears and I've ended up with contra-rotating pairs of fans at each end when I'm pretty sure they all should all rotate the same way! No-body seems to notice (or are too kind to point it out), but I want to get it right on Monitor and it'll be the first thing I tackle... If you are having working fans, can you share how you're doing them m8? :wave: Cheers, Ian.Dan Randall
Western Thunderer
Thanks chaps.
Ian , despite the fact I have working lights, sound and smoke, I decided some time ago not to bother making the fans work!
I think the main reason is that once I get stuck into building a layout, I'll be aiming to have the boards quite high, to give the viewer a kind of lineside viewpoint. At this kind of level, rotating fans would be a little wasted on my models, though I can see a certain appeal in making them work.
I can't really help you with your fans I'm afraid, but your method of motorising them on your previous Western sounds perfectly good. It sounds like you just need to separate the drive shafts and stick an extra gear in there somewhere, to achieve the correct rotation you're after. Don't forget to post some pictures on here when you've worked it out.
Regards
Dan
lancer1027
Western Thunderer
Nice , very nice Dan. I look forward to the next installment
Rob :wave:
I look forward to the next installment Rob :wave:
Simon
Flying Squad
This is inspirational stuff and the results are terrific. I especially like the explanation of your various jigs, simple but very effective - even I might be able to use some of those ideas.
I really ought to get to grips with weathering my stuff properly too, threads like this are invaluable so thanks very much for sharing your work
I really ought to get to grips with weathering my stuff properly too, threads like this are invaluable so thanks very much for sharing your work
Phill Dyson
Western Thunderer
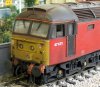
Judging by the 47 in your avatar Mike, I think you could teach us all a thing or two about weatheringRessaldar said:great weathering there and an inspiration to would be weatherers.
regards
Mike
Phill :wave:
Scale7JB
Western Thunderer
Jordan said:
The next step is to motorise the wipers themselves...
Hmmmm... It wouldn't be that difficult... :scratch:
JB.
Dan Randall
Western Thunderer
Judging by the 47 in your avatar Mike, I think you could teach us all a thing or two about weatheringPhill Dyson said:[quote=""Ressaldar"":1s67d6ts]great weathering there and an inspiration to would be weatherers.
regards
Mike
Phill :wave:[/quote:1s67d6ts]
I agree with Phil.
Any chance of seeing some bigger pictures of your 47 some time Mike?Thanks for all your positive comments guys and no Jordan, I won't be motorising the wipers. :lol:
I think Scale7JB is quite taken with the idea though and it's about time he put all that Eastern stuff to one side (good though it is) and built a diesel, preferably a Western Region one. :lol:
Regards
Dan

Scale7JB
Western Thunderer
Judging by the 47 in your avatar Mike, I think you could teach us all a thing or two about weatheringDan Randall said:[quote=""Phill Dyson"":3vptw4as][quote=""Ressaldar"":3vptw4as]great weathering there and an inspiration to would be weatherers.
regards
Mike
Phill :wave:[/quote:3vptw4as]
I agree with Phil.
Any chance of seeing some bigger pictures of your 47 some time Mike?Thanks for all your positive comments guys and no Jordan, I won't be motorising the wipers. :lol:
I think Scale7JB is quite taken with the idea though and it's about time he put all that Eastern stuff to one side (good though it is) and built a diesel, preferably a Western Region one. :lol:
Regards
Dan[/quote:3vptw4as]
Don't worry Dan, I'll eventually get around to building my 'GREEN' Diesels... :laugh:
JB.