7mm Connoisseur Models LNER N10 Tank Engine

Rob Pulham

Western Thunderer
This posting is a little bit of a surprise because I wasn't expecting to do much with it.

I have been using this kit when I demo loco building at shows, I would rather take one of my kits along than one that I am building for someone else just in case anything happens to it.

Up to Saturday I had only managed to cut out the frames, remove the cusps and bend up the frame spacers (at Newton Aycliffe Show in March) due to being far too busy talking to people.

Although I did have lots of interest I seemed to really crack on with it after showing one gent how to solder up the boiler.

This build will get updated intermittently because I will be only working on it at shows until it's well on its way.

I think that this amount of progress in between talking to people really is a testament to Jim McGeown and the quality of the kit/fit of the parts.

48081064372_69d5572d1b_b.jpg


48081064187_167a2da7f8_b.jpg


48080966396_3262ef2291_b.jpg


48081063747_b3a0f74a84_b.jpg


48081063572_6a690e627a_b.jpg


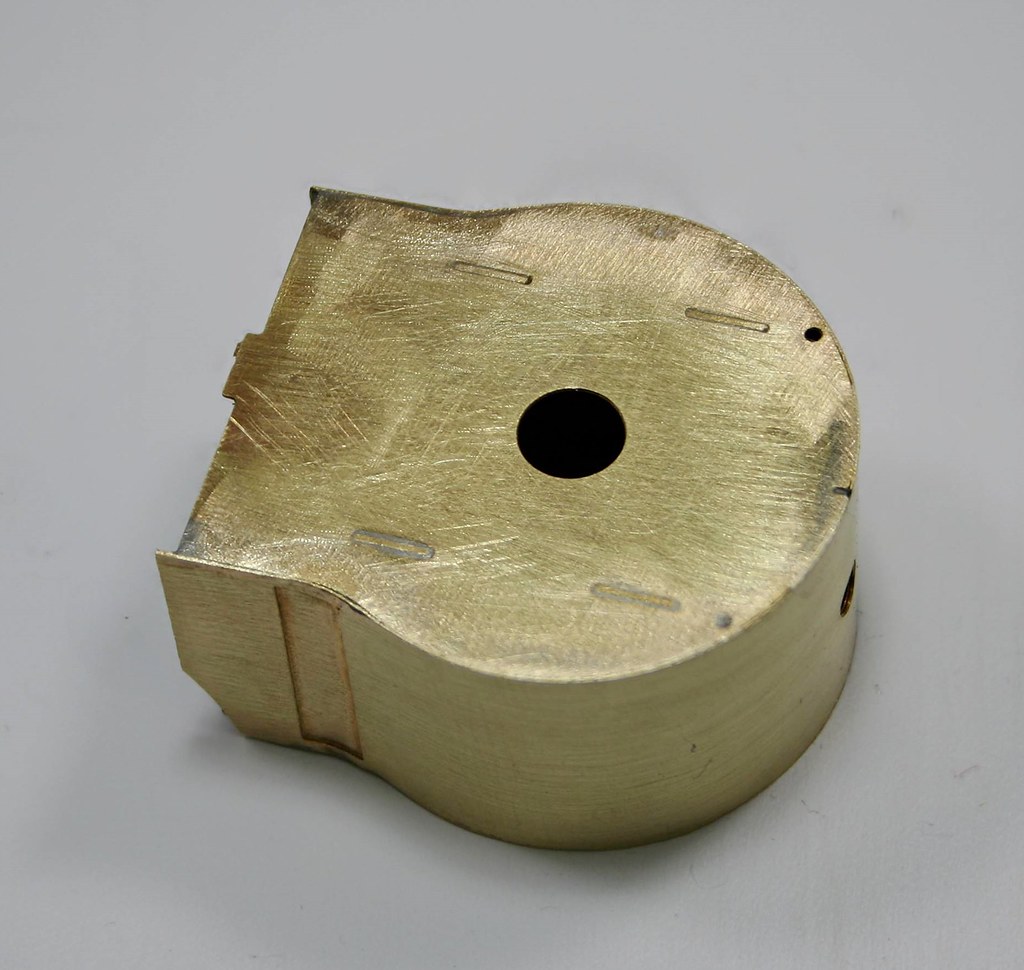
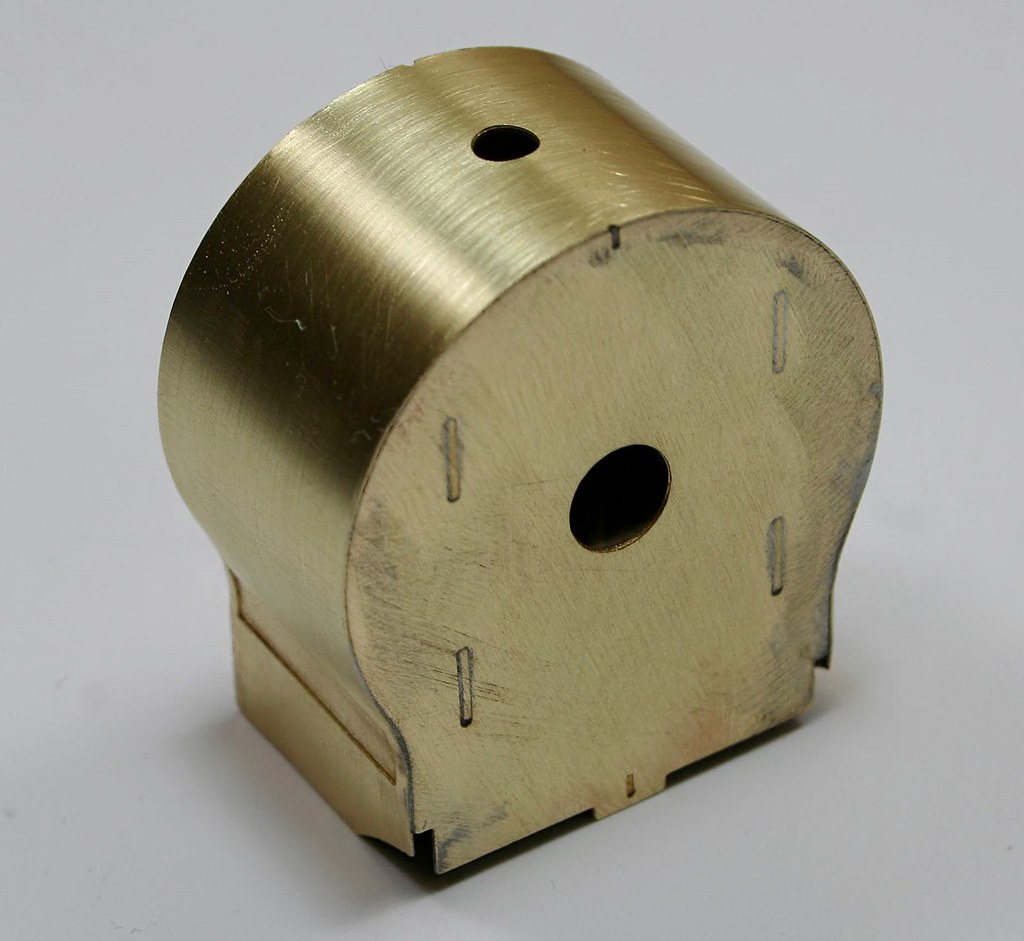
I didn't take my rolling bars along nor did I have anything thicker than a scriber. So to roll the smokebox wrapper I had to sit and bend the etch between fingers and thumbs. Working steadily away until it reached the right shape.
 

Focalplane

Western Thunderer
I have built the Connoisseur Jinty and 4F and there is nothing left in Jim’s range that interests me, sad to say. They were a great introduction to 7mm kits and fed, quite naturally, onto David Andrews’ range. His wagons are a great range too.
 

Rob Pulham

Western Thunderer
I have built the Connoisseur Jinty and 4F and there is nothing left in Jim’s range that interests me, sad to say. They were a great introduction to 7mm kits and fed, quite naturally, onto David Andrews’ range. His wagons are a great range too.

I am lucky in that respect, Jim has quite a number of LNER or constituents examples in his range. I have most of the wagons but there are a few of the locos on the wanted at some point list.
 

Rob Pulham

Western Thunderer
My N10 has been out to numerous shows since 2019, the last one being the recent Wensleydale Model Railway show at Leeming Bar.

The loco build has moved on quite a way since then.

First as often happens when talking to people at shows - a step in the wrong direction. In my last post I had fitted the smokebox wrapper and I had done a lovely job of it even if I say so myself. However do pop back and have a look you will notice a half etched recess low down on the side. This is meant to be on the inside... Sadly I made a bit of a mess taking it off so had to make a new one from nickel sheet.

53726538175_3d18c2139d_b.jpg

The body work has progressed a bit too.

53726537410_bd60cca908_b.jpg

53726313983_81b9627d17_b.jpg

53726443599_b62f2e9ff7_b.jpg
 

Rob Pulham

Western Thunderer
I have also got a number of other bits near to being finally assembled.

53726313913_d1848bdfd3_b.jpg

Frame spacers, I found another two or three in the box afterwards but you get the drift.

53726539200_47ccf220b8_b.jpg


Inner cab rear with locker and coal chute door.

53726098716_7204b71380_b.jpg

Inner tanks

53725196687_a8fe0fc829_b.jpg

Rear cab lockers and horn guides

53726538265_15380c27f8_b.jpg

53725195792_968f5f637c_b.jpg

Inner cab roof. I didn't attempt to roll the outer roof without rolling bars I managed to do the inner with just manipulation between my fingers and the edge of the cutting mat.

53725195352_00a29beb8f_b.jpg

Cab floor and front lockers/rear splashers

53726096086_77dc6c1f64_b.jpg

Frames. I had marked and cut out roughly for the horn guides and was painstakingly filing them when I thought it would be much easier to mill them slightly but accurately over size so that I can use my chassis jig to fit them. I also invested in a set of Premier joined rods.
 

Gadgie

Western Thunderer
Hopefully here is some N10 inspiration — 69109 is a regular performer on South Pelaw, and is built from the shot-down 4mm version of the Connoisseur kit that used to be available. It was a lovely kit to build, and runs very sweetly despite a rigid chassis.

IMG_1030.jpeg

It is sometimes seen along with 69101, built by Joe Warr from an Arthur Kimber kit.

IMG_1027.jpeg

Richard
 

Rob Pulham

Western Thunderer
Thanks Richard,

Inspiration indeed, mine will be finished in LNER livery but no doubt equally gubby by the time I have finished it.
 

Rob Pulham

Western Thunderer
It seems that I hadn't taken any photos when I assembled the chassis for the N10 which I did some time ago.

A couple of days ago I managed to get around to fitting the hornguides and the last (front) frame spacer. The latter needed to be modified to fit around the front horn guide.

55273261816_3fa60dfc6c_h.jpg

55273653680_9c04d433de_h.jpg
 

Rob Pulham

Western Thunderer
In between fitting the oil boxes to the 8F, I have also made up an ash pan for the N10 and fitted the driving wheel springs (which retain the hornblocks).

I was pleased that it ran nice and sweetly without any adjustments. My buying and repairing those two Shogun motor gearbox units has proved fortuitous although I didn't know it at the time. Having elected to drive from the rear axle none of my other gearboxes were long enough to clear the cab and bring the motor into the firebox. The Shogun units are and I will earmark the other one for the N8/9 that's in the stash. As I can foresee that having similar issues, if I want to drive from the rear axle.

55325403384_3d822cb5fd_h.jpg

55325342733_283c81a614_h.jpg

55325184261_ffbf0cac83_h.jpg
 

Rob Pulham

Western Thunderer
Still flitting between the 8F and the N10 and managing to make good (for me) progress on both.

On the N10 I was able to get the brakes fitted - I did cut the brass shoes off and fit some 3D printed shoes that I had drawn up and a friend printed for me.

55336355036_05d36ec7da_h.jpg

On the image of LNER no 1138 which is my chosen loco I noted that there is a tap and a clamp at the side of the ashpan.

55334163696_e51c4d4a3b_h.jpg

You may think that I have made a bit f a mess of cutting out the hole for the clamp but although I have seen some photos with overlapping round holes in the frames for the clamp, on 1138 it looks to have been crudely cut out with a gas axe.

55334163866_49b2606db8_h.jpg

As you can see from the comparison so I was able to get away with not managing to cut out round holes so easily.

Both the clamp and the tap could really do to have been a little higher up the frames but due to the way that Jim has designed the ashpan mountings it was difficult to make the holes higher up so I'm working on something even if a little low is better than nothing.

I also popped the air tank in the lathe and cleaned up the ends. To prevent the cast rivets from being damaged I wrapped the casting in a strip of aluminium sheet recovered from empty shaving foam cans. This is a bit thicker than the aluminium recovered from drinks cans so does a bit better job of protection. A note of caution. I also use antiperspirant* which comes in exactly the same cans but is much higher pressure so I don't tend to use them for recycling.

55332297105_137572a1e4_h.jpg
 

Rob Pulham

Western Thunderer
I managed the first bit of modelling for nearly a week a few days ago. I need a number of 1/4 round brass rings to represent the brass cover over the joint between boiler and smokebox on my ex NER engines. Thankfully many of them used the same boiler so that simplifies things a little.

In the past I have used copper wire rolled into a ring and soldered to a piece of sheet, then filed to half thickness. Remove, re-roll with the flat side innermost and repeat. Which, not only isn't very accurate, it's tedious and perhaps more importantly the outer face of the final ring gets coated in solder. Neither solder or copper for that matter look like brass so I sought an alternative.

Some time ago I bought a length of 2mm x 1mm half round brass beading and using an Arbor made from rolled 0.7mm nickel sheet. I rolled a length and turned it down for my friend's G5. Although much better than either of us could have managed by hand, I wasn't satisfied with it because the rolled Arbor wasn't very rigid and being thinnish sheet which was rolled, I couldn't tighten up the chuck too much to get a better grip without crushing it. If I'd had a collet big enough (just under 32mm) that would have worked, but ER32 collets only go up to 25.5mm and my set only goes to 20mm at present. So the three jaw it has to be.

I decided to see what I had that I could make a more rigid Arbor from, and in amongst the bits and pieces that my local Agricultural repair guy had given me, I found a short length of 1.25" thick walled steel tube. which just happens to be just under 32mm.

I faced off each end so that I could be sure that it sat square in the chuck and turned a 1mm long recess in one end so that I could fit (with the aid of superglue) the ring with 1mm of the width protruding. It worked perfectly, aside from my first attempt was a little short, so I made another.

The first one will go in the spares box for my J71 kit which has a smaller boiler.

55358636136_228d10015c_b.jpg

55358835174_621e285bc4_h.jpg

55357700747_623d4e21c9_h.jpg

55359057005_88980b243f_h.jpg

55358835134_a088a0c2b7_h.jpg

55362121743_0c0dc13052_h.jpg
 

Ian@StEnochs

Western Thunderer
I managed the first bit of modelling for nearly a week a few days ago. I need a number of 1/4 round brass rings to represent the brass cover over the joint between boiler and smokebox on my ex NER engines. Thankfully many of them used the same boiler so that simplifies things a little.

In the past I have used copper wire rolled into a ring and soldered to a piece of sheet, then filed to half thickness. Remove, re-roll with the flat side innermost and repeat. Which, not only isn't very accurate, it's tedious and perhaps more importantly the outer face of the final ring gets coated in solder. Neither solder or copper for that matter look like brass so I sought an alternative.

Some time ago I bought a length of 2mm x 1mm half round brass beading and using an Arbor made from rolled 0.7mm nickel sheet. I rolled a length and turned it down for my friend's G5. Although much better than either of us could have managed by hand, I wasn't satisfied with it because the rolled Arbor wasn't very rigid and being thinnish sheet which was rolled, I couldn't tighten up the chuck too much to get a better grip without crushing it. If I'd had a collet big enough (just under 32mm) that would have worked, but ER32 collets only go up to 25.5mm and my set only goes to 20mm at present. So the three jaw it has to be.

I decided to see what I had that I could make a more rigid Arbor from, and in amongst the bits and pieces that my local Agricultural repair guy had given me, I found a short length of 1.25" thick walled steel tube. which just happens to be just under 32mm.

I faced off each end so that I could be sure that it sat square in the chuck and turned a 1mm long recess in one end so that I could fit (with the aid of superglue) the ring with 1mm of the width protruding. It worked perfectly, aside from my first attempt was a little short, so I made another.

The first one will go in the spares box for my J71 kit which has a smaller boiler.

View attachment 267596

View attachment 267597

View attachment 267598

View attachment 267599

View attachment 267600

View attachment 267601

Rob

I always make the boiler seperate from the smokebox and join them with a screw to make painting easier. The brass cover over the joint I make by soldering a ring of 1/2 round brass wire soldered onto the boiler with half overhanging the end. The surplus is removed either with a big file and rubbing on a sheet of emery or turning between centres. Works for size of boiler.

Ian.
 
Last edited:

Lawrence Boul

Western Thunderer
I managed the first bit of modelling for nearly a week a few days ago. I need a number of 1/4 round brass rings to represent the brass cover over the joint between boiler and smokebox on my ex NER engines. Thankfully many of them used the same boiler so that simplifies things a little.

In the past I have used copper wire rolled into a ring and soldered to a piece of sheet, then filed to half thickness. Remove, re-roll with the flat side innermost and repeat. Which, not only isn't very accurate, it's tedious and perhaps more importantly the outer face of the final ring gets coated in solder. Neither solder or copper for that matter look like brass so I sought an alternative.

Some time ago I bought a length of 2mm x 1mm half round brass beading and using an Arbor made from rolled 0.7mm nickel sheet. I rolled a length and turned it down for my friend's G5. Although much better than either of us could have managed by hand, I wasn't satisfied with it because the rolled Arbor wasn't very rigid and being thinnish sheet which was rolled, I couldn't tighten up the chuck too much to get a better grip without crushing it. If I'd had a collet big enough (just under 32mm) that would have worked, but ER32 collets only go up to 25.5mm and my set only goes to 20mm at present. So the three jaw it has to be.

I decided to see what I had that I could make a more rigid Arbor from, and in amongst the bits and pieces that my local Agricultural repair guy had given me, I found a short length of 1.25" thick walled steel tube. which just happens to be just under 32mm.

I faced off each end so that I could be sure that it sat square in the chuck and turned a 1mm long recess in one end so that I could fit (with the aid of superglue) the ring with 1mm of the width protruding. It worked perfectly, aside from my first attempt was a little short, so I made another.

The first one will go in the spares box for my J71 kit which has a smaller boiler.

View attachment 267596

View attachment 267597

View attachment 267598

View attachment 267599

View attachment 267600

View attachment 267601
That's a good idea. If CA works, I'd consider printing the arbour if convenient stock is not to hand. Prints are not the be all, but frequently a quick print is easier than faffing around machining a fixture. I certainly wouldn't be using one for a heavy job, but they work well for small stuff.
 

RichardG

Western Thunderer
I always make the boiler seperate from the smokebox and join them with a screw to make painting easier. The brass cover over the joint I make by soldering a ring of 1/2 round brass wire soldered onto the boiler with half overhanging the end. The surplus is removed either with a big file and rubbing on a sheet of emery or turning between centres. Works for size of boiler.

I want to remember this!

Up until now I have used round wire and filled in the edges with solder to make a quadrant. This method sounds a whole lot more elegant.
 

Rob Pulham

Western Thunderer
Rob

I always make the boiler seperate from the smokebox and join them with a screw to make painting easier. The brass cover over the joint I make by soldering a ring of 1/2 round brass wire soldered onto the boiler with half overhanging the end. The surplus is removed either with a big file and rubbing on a sheet of emery or turning between centres. Works for size of boiler.

Ian.
Hi Ian,

I confess that I hadn't thought of turning between centres, something to consider if I need to make any bigger rings in the future. I am quite lucky in that many of the locos that I intend to make have the same boiler or smaller so my mandrel will work for all of them. The smaller ones will just need the ring tightening which I can do by hand. The N10 and no doubt most of the other tank engines only have half a boiler at the cab end so turning between centres isn't and option.

You must be much better or patient with a file than I am, my use of a mandrel was to get away from having to file (not very accurately in my case) the remaining quarter of the ring. But as ever when we start to discuss things I have just remembered that in some of my more vintage versions of kits that now reside with Gladiator there are some solid brass plain and machined tubes. While I may struggle to use these on the loco when I get to building them I realise that they would be ideal for use as mandrels

55372401962_96f4af0640_h.jpg

Not very clear in the photos being all brass the two that are turned actually have very nicely turned transition ring which would alleviate the need for DIY assuming of course that you can manage to attach all the boiler fittings to the heavy heat sink of a tube without melting them.

55372407637_5e47d05c3b_h.jpg

For anyone who is remotely interested, they are from the following 'kits' (left to right):

George Norton J21

07 Models N8/9 - 07 was the forerunner of some of the George Norton Range, so real ancient history.

London Road Models G5
 

Rob Pulham

Western Thunderer
That's a good idea. If CA works, I'd consider printing the arbour if convenient stock is not to hand. Prints are not the be all, but frequently a quick print is easier than faffing around machining a fixture. I certainly wouldn't be using one for a heavy job, but they work well for small stuff.
Thanks Lawrence,

Sadly although I do some 3D designing, I don't have a printer (or room to host one). Although I have a friend who does printing for me, he's not nearby, so it's not convenient as he needs to post things out to me. To make matters worse, we have just received notification from Royal Mail, that they are only going to deliver our 2nd class mail every 3 days going forward.
 

Rob Pulham

Western Thunderer
Something else that I discovered along the way, for those who use superglue as a temporary fixing. Methylated spirits makes a really good superglue debonder.

I discovered it, by accident after getting some superglue on my fingers. Although I hadn't stuck them together, I noticed that I had a layer of tight skin where the superglue was on a couple of fingers. I didn't think too much about it, but a short time later I was cleaning some engineers blue off something that I had marked up, using meths on a piece of kitchen paper. When I had finished I noticed that the superglue residue, was gone from my fingers.

Previously when I wanted to release superglue from an arbor/mandrel, I heated it up. Making sure that my extractor fan was running as I have heard that it give off noxiuos gasses for a few moments. But, after noting that the glue had gone from my fingers I dropped the brass ring on the mandrel into a jar of meths and after a few moments I was able to remove the brass ring with ease.
 

Rob Pulham

Western Thunderer
Sticking with the theme of transition rings/covers, Tom Burnham emailed me to share that on the full sized locos that the brass cover also incorporates a flange for securing the cover to the boiler. This sits under the leading cladding band which as a result appears slightly thicker than the others. After learning this I set out to replicate it in miniature. By good fortune in amongst my saved scrap etch stips was a piece a little thicker than the supplied boiler band and exactly twice the width.

At this point the inner tanks and the boiler are just sat in place for the photo so there will be some adjustment when the boiler is finally fitted.

55373499438_49dc96e3b1_h.jpg

I'm happy with that so far.
 
Top